
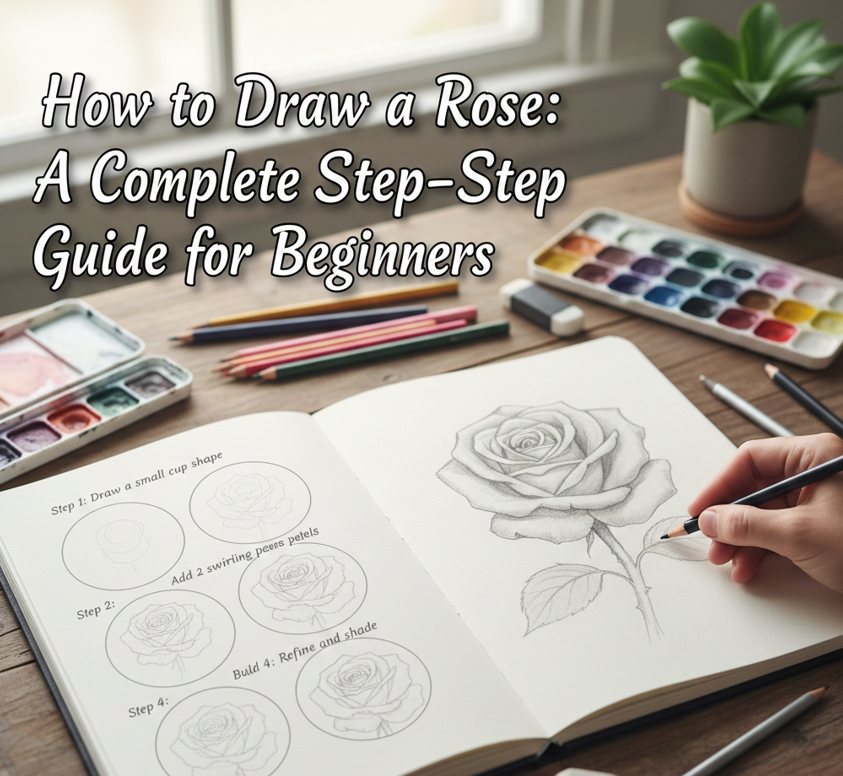
Learning how to draw a rose is one of the most rewarding experiences for artists of all skill levels. Roses symbolize beauty, love, and elegance, making them one of the most popular subjects in art. Whether you are a beginner picking up a pencil for the first time, a parent helping a child learn drawing basics, or an aspiring artist aiming for realism, mastering rose drawing can significantly improve your artistic confidence.
This comprehensive guide explains how to draw a rose easy, step by step, and in simple and realistic ways. Drawing from artistic principles, real-world sketching experience, and proven instructional techniques, this article breaks down complex shapes into approachable steps. You will learn how rose petals form, how shading creates depth, and how simple pencil strokes can turn into a lifelike flower.
By the end of this guide, you will not only understand how to draw a rose with pencil, but you will also gain the skills to create your own unique rose drawings with confidence and creativity.
Understanding the Basic Structure of a Rose Before Drawing
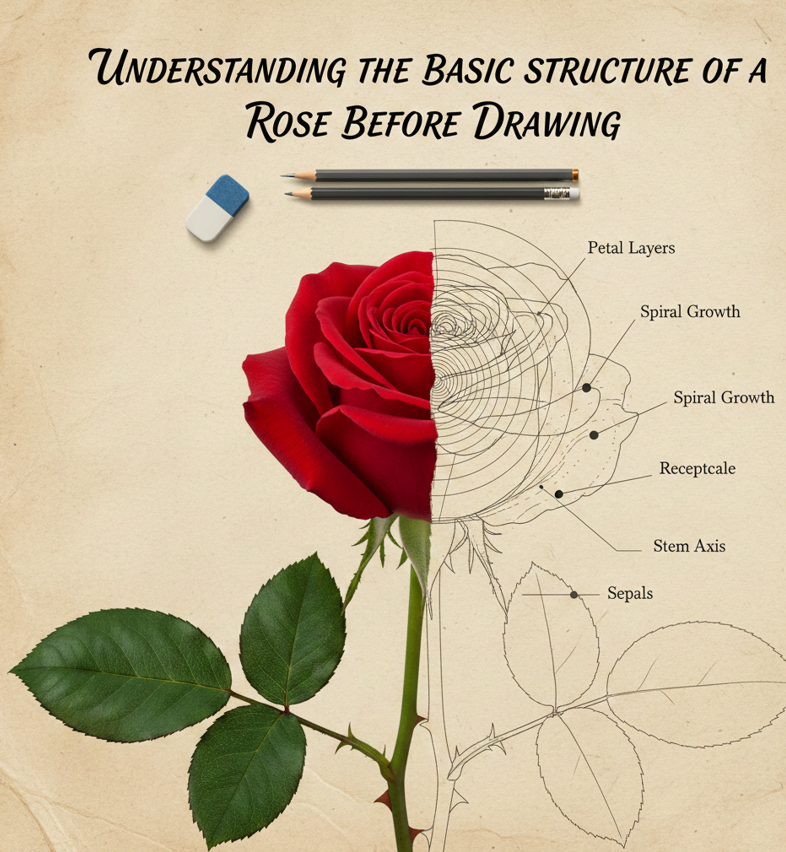
Before learning how to draw a rose step by step, it is essential to understand the flower’s natural structure. Roses may look complex, but they are built from simple curved shapes layered in a spiral form. Observing real roses or reference images helps artists recognize how petals overlap and fold inward.
A rose typically starts with a tight center bud, surrounded by gradually opening petals. The outer petals are larger and more relaxed, while the inner ones are smaller and tightly curled. This layered design is the foundation of every rose drawing, whether simple or realistic.
Understanding this structure allows artists to draw roses more accurately and confidently, reducing frustration and improving results.
Key Elements That Make a Rose Look Natural
• A rose grows in a circular spiral, not flat layers, which gives it depth and realism.
The spiral structure helps artists visualize petal placement and prevents drawings from looking stiff or artificial. When sketching lightly, this spiral acts as a guide rather than a strict outline, allowing more natural flow and movement.
• Petals have soft, irregular edges instead of sharp straight lines.
Roses in nature are imperfect, and capturing that softness makes a drawing look alive. Avoid drawing identical petals; variation in size and shape adds authenticity and artistic charm.
• Overlapping petals create depth and perspective.
Each petal partially hides another, forming layers that give the rose its signature look. Practicing overlaps helps artists understand perspective and enhances realism.
• The center of the rose is tight and detailed.
This focal point draws the viewer’s attention and sets the tone for the entire drawing. Spending extra time refining the center improves the overall appearance.
• Outer petals are wider and more open.
These petals balance the composition and frame the rose beautifully. They also provide space for shading and texture.
• Light and shadow define form and volume.
Without shading, a rose drawing appears flat. Proper shadows under overlapping petals give the illusion of depth and realism.
Also Read: How to Add Fractions: A Complete Step-by-Step Learning Guide
How to Draw a Rose Easy for Absolute Beginners
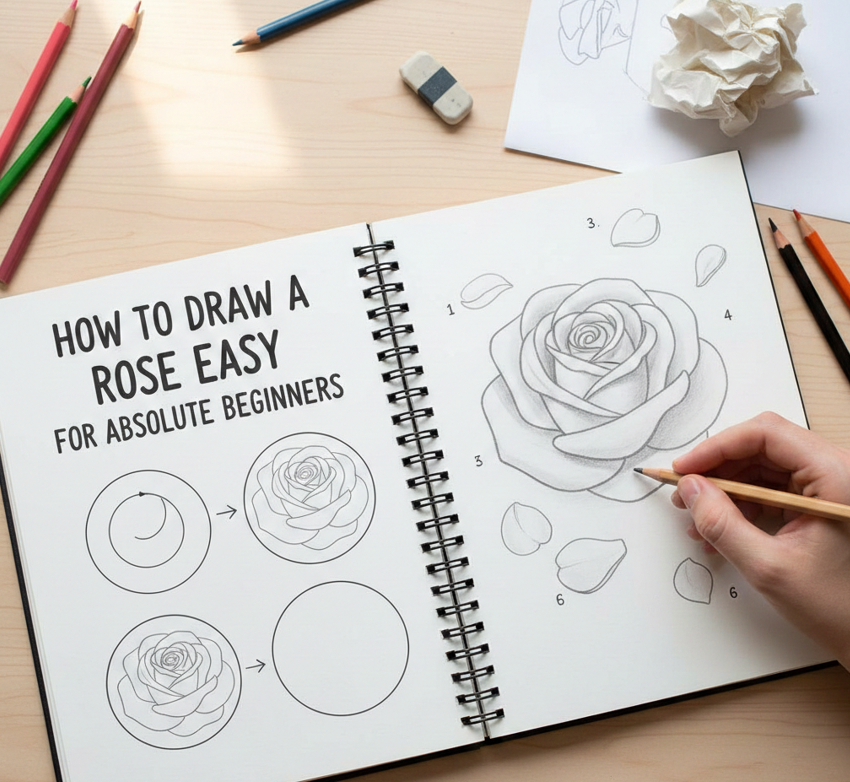
Learning how to draw a rose easy starts with removing fear and complexity. Beginners often think roses are too difficult, but by breaking the process into small steps, anyone can succeed. This approach focuses on simple shapes, relaxed lines, and minimal details.
An easy rose drawing does not require perfection. Instead, it emphasizes understanding form and flow. Using light pencil strokes allows you to correct mistakes without pressure, making the learning process enjoyable.
This method is perfect for beginners who want quick results while building foundational drawing skills.
Simple Techniques to Make Rose Drawing Easy
• Start with a loose circular shape as a guide.
This circle represents the overall size of the rose and keeps proportions balanced. It prevents the drawing from becoming too large or uneven and serves as a helpful boundary.
• Draw a small spiral in the center.
The spiral mimics the natural curl of rose petals and acts as the heart of the flower. Keeping it loose ensures the drawing remains flexible and organic.
• Add curved lines around the spiral for petals.
These curved strokes should flow outward naturally, gradually increasing in size. This technique simplifies petal placement and avoids overthinking details.
• Keep lines light and sketchy.
Light strokes are easier to adjust and erase. This approach builds confidence and encourages experimentation without fear of mistakes.
• Focus on overall shape, not perfection.
At this stage, capturing the rose’s form matters more than details. Minor imperfections add character and realism.
• Avoid heavy shading in early stages.
Simple outlines help beginners understand structure before adding complexity. Shading can always be added later as skills improve.
Also Read: How to Cook Chicken Breast in Oven Complete Step-by-Step Guide
How to Draw a Rose Step by Step for Better Accuracy
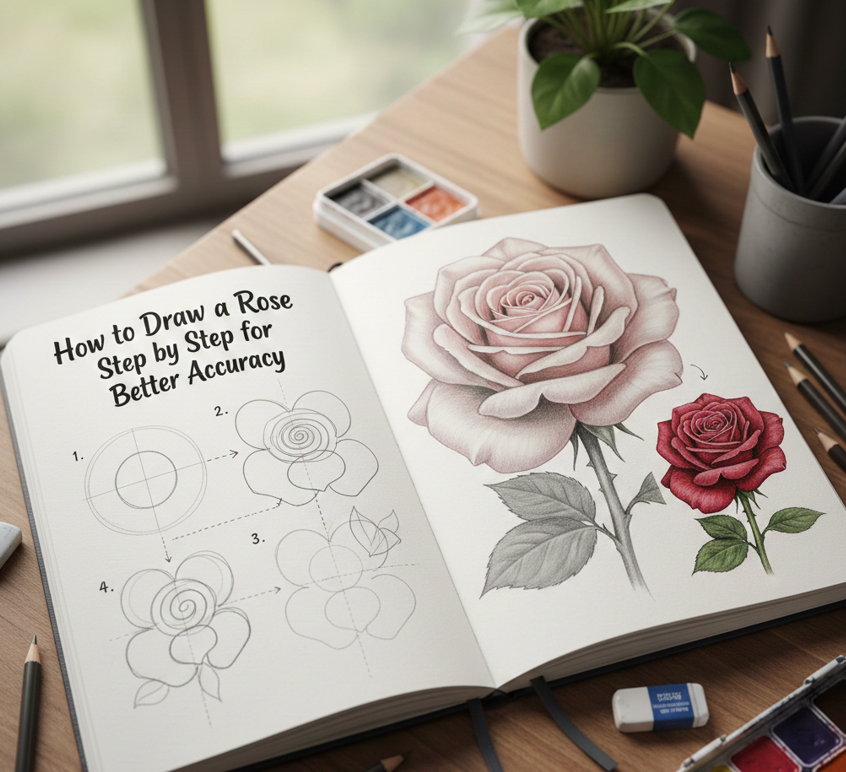
Understanding how to draw a rose step by step provides clarity and structure, especially for learners who prefer organized methods. A step-by-step approach ensures that each part of the rose builds logically on the previous one.
This method is commonly used by professional artists and instructors because it reduces errors and improves consistency. It is especially helpful for those transitioning from beginner to intermediate levels.
By following clear steps, artists can replicate results and gradually develop their own style.
Step-by-Step Rose Drawing Process
• Step one involves drawing a light center spiral.
This spiral sets the direction and flow of petals, helping maintain symmetry while still looking natural and organic.
• Step two adds inner petals around the spiral.
These petals should be small and closely packed, reflecting how real roses grow from the center outward.
• Step three introduces medium-sized petals.
As the rose expands, petals become wider and more open, creating visual balance and depth.
• Step four completes the outer petals.
These petals define the rose’s overall shape and provide space for shading and texture.
• Step five refines outlines and removes guides.
Cleaning up sketch lines makes the drawing clearer and more polished without losing its natural look.
• Step six adds shading and texture.
Light shading under overlapping petals enhances realism and gives the rose a three-dimensional appearance.
Also Read: How to Soften Brown Sugar: The Complete Expert Guide for Every Situation
How to Draw a Rose Simple Without Complex Details

Learning how to draw a rose simple focuses on minimalism and clarity. Simple rose drawings are ideal for quick sketches, journaling, or decorative art where detail is not the priority.
This approach emphasizes clean lines and recognizable shapes rather than realism. It is also perfect for beginners who want satisfying results without spending hours on shading and refinement.
Simple rose drawings are widely used in logos, tattoos, and illustrations due to their elegance and clarity.
Ways to Keep Rose Drawing Simple
• Use fewer petals and larger shapes.
Reducing petal count makes the drawing easier to manage and visually clean.
• Avoid excessive overlaps.
Minimal overlapping keeps the design readable and uncluttered, especially in small drawings.
• Draw smooth, confident lines.
Simple drawings benefit from clean strokes that communicate form clearly and efficiently.
• Skip detailed shading.
Outlines alone can effectively represent a rose without added complexity.
• Maintain balanced proportions.
A well-proportioned rose looks appealing even without intricate details.
• Focus on symbolic representation.
Simple roses capture the idea of a rose rather than photographic accuracy.
Also Read: How to Cut a Pineapple: A Complete, Easy, and Waste-Free Guide for Beginners
How to Draw a Rose Easy for Kids
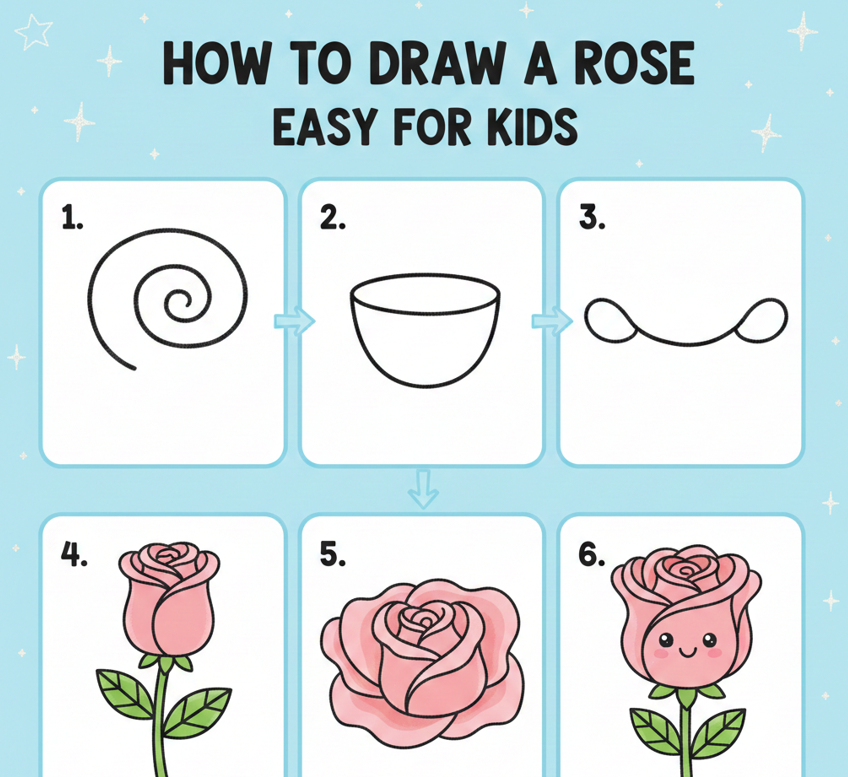
Teaching how to draw a rose easy for kids requires patience, simplicity, and encouragement. Children benefit from fun, stress-free drawing experiences that focus on creativity rather than perfection.
Kid-friendly rose drawings use basic shapes like circles and curves. This approach builds confidence and helps children develop motor skills and artistic interest.
Drawing roses can also be a fun educational activity that enhances observation and imagination.
Kid-Friendly Rose Drawing Tips
• Use large shapes and bold lines.
Big shapes are easier for children to control and understand visually.
• Break steps into simple actions.
Short, clear instructions keep kids engaged and reduce confusion.
• Encourage creativity over accuracy.
Let children add colors, patterns, or imaginative details to make the rose their own.
• Use crayons or colored pencils.
These tools are easier for small hands and make the activity more enjoyable.
• Avoid criticism and corrections.
Positive feedback builds confidence and motivation to keep drawing.
• Turn drawing into a story or game.
Making the rose part of a fun narrative increases engagement and learning.
Also Read: How to Learn English Fast: Practical Strategies
How to Draw a Rose with Pencil Like an Artist
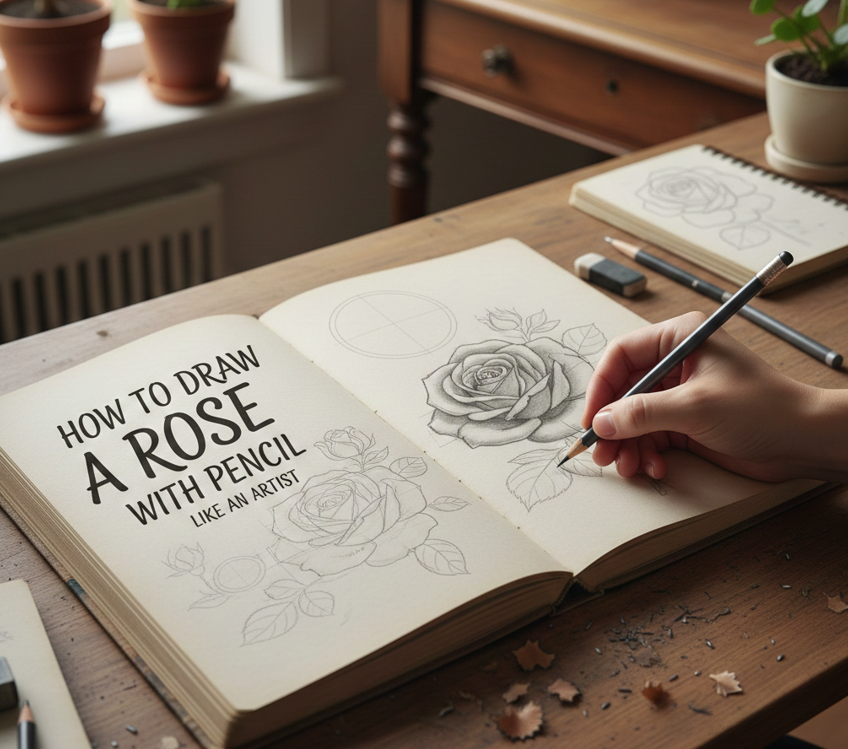
Learning how to draw a rose with pencil introduces artists to shading, texture, and depth. Pencil drawing allows for subtle transitions and detailed control, making it ideal for rose illustrations.
Artists often prefer graphite pencils because they offer a wide range of tones. Using different pressure levels helps create realistic petals and soft gradients.
This method bridges the gap between simple sketches and realistic art.
Essential Pencil Techniques for Rose Drawing
• Choose the right pencil grades.
HB pencils work for outlines, while softer pencils like 2B and 4B add depth and shading.
• Use light pressure for initial sketches.
Light lines prevent smudging and allow easy corrections.
• Shade gradually in layers.
Layered shading builds smooth transitions and avoids harsh contrasts.
• Follow the direction of petals.
Shading along petal curves enhances realism and natural flow.
• Blend gently with tissue or blending tools.
Soft blending creates smooth textures without losing detail.
• Preserve highlights by leaving areas unshaded.
Highlights add dimension and make petals appear soft and delicate.
Also Read: How to Jump Start a Car: The Complete Step-by-Step Guide for Any Situation
How to Draw a Rose Realistic with Depth and Detail
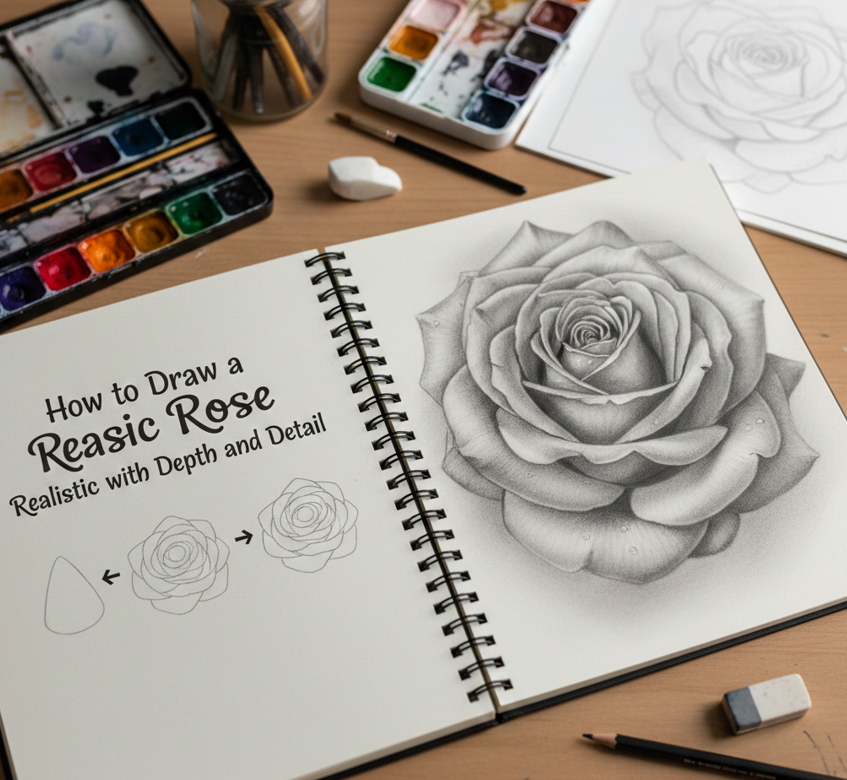
Mastering how to draw a rose realistic requires observation, patience, and practice. Realistic rose drawings aim to capture light, texture, and form as seen in nature.
Artists often study real roses or high-quality references to understand petal folds and shadows. Realism is achieved through careful shading, accurate proportions, and attention to detail.
This style is ideal for advanced learners and those seeking professional-level artwork.
Techniques for Realistic Rose Drawing
• Study real roses or reference photos.
Observing natural details improves accuracy and understanding of form.
• Build shading slowly and thoughtfully.
Gradual shading creates smooth depth and avoids flat areas.
• Add subtle texture to petals.
Tiny lines and variations suggest softness and realism.
• Enhance contrast between light and shadow.
Strong contrast defines form and adds dramatic effect.
• Refine edges carefully.
Sharp edges indicate folds, while soft edges suggest gentle curves.
• Take breaks to review proportions.
Stepping back helps identify errors and improve balance.
Conclusion
Learning how to draw a rose is a valuable artistic skill that combines creativity, observation, and technique. Whether you are exploring easy rose drawings, teaching kids, or pursuing realistic pencil art, this guide provides the structure and confidence you need to succeed.
By practicing step by step, focusing on form, and developing shading skills, anyone can draw a beautiful rose. Keep experimenting, stay patient, and enjoy the artistic journey—because every rose drawing brings you closer to mastery
FAQs
Is drawing a rose hard for beginners?
No, learning how to draw a rose becomes easy when broken into simple steps and shapes.
What pencil is best for rose drawing?
HB for outlines and 2B–4B pencils for shading work best.
How long does it take to learn rose drawing?
With regular practice, noticeable improvement can occur within a few weeks
For More Updates Visit: Biomagazine