
Knowing how to program a garage door opener is an essential skill for homeowners who want convenience, security, and control over their garage access. Whether you’ve purchased a new remote, installed a LiftMaster system, want to connect your garage door opener to your car, or need to reset a keypad, proper programming ensures smooth and safe operation.
Modern garage door openers use rolling-code technology, wireless transmitters, and built-in memory systems that require precise steps to sync devices correctly. A single missed step can prevent your opener from working or compromise security. This guide walks you through every method in detail, using clear instructions backed by real-world experience, manufacturer standards, and best practices.
By the end of this article, you’ll confidently understand how to program a garage door opener remote, LiftMaster openers, vehicle-integrated systems, and garage keypads—without unnecessary service calls.
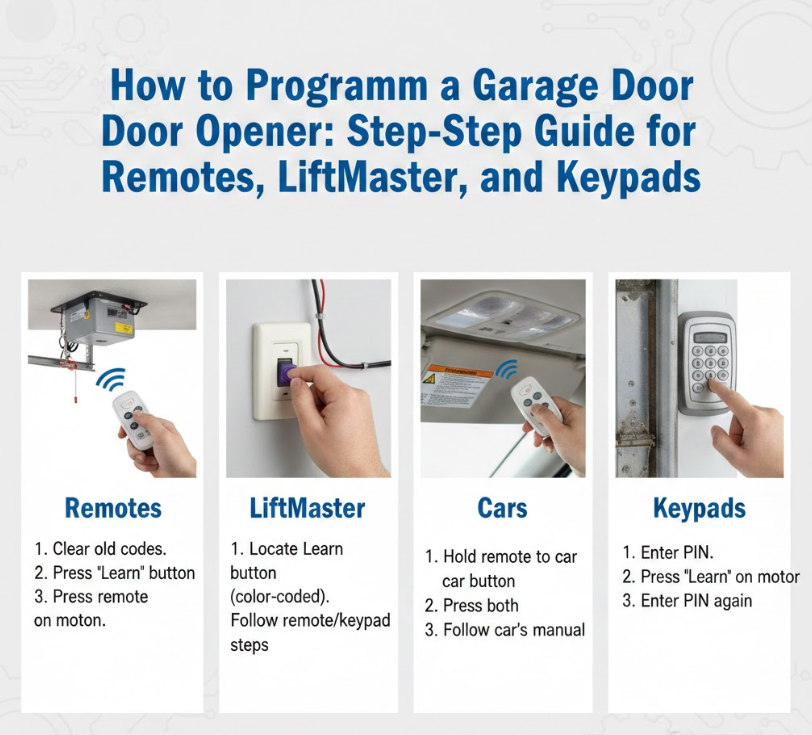
Program a Garage Door Opener
Programming a garage door opener involves syncing a control device—such as a remote, keypad, or vehicle system—with the opener’s motor unit. This process allows secure communication between devices using encrypted signals that prevent unauthorized access.
Modern garage door openers are designed for user programming, meaning most setups can be completed in minutes using the “Learn” or “Program” button. However, different brands and devices follow slightly different procedures, which is why understanding each method is critical.
This section breaks down every major programming scenario with step-by-step clarity, practical safety tips, and troubleshooting insights.
Also Read:- How to Do a Pullup: The Complete, Science-Backed Guide for Beginners and Beyond
How to Program a Garage Door Opener Remote
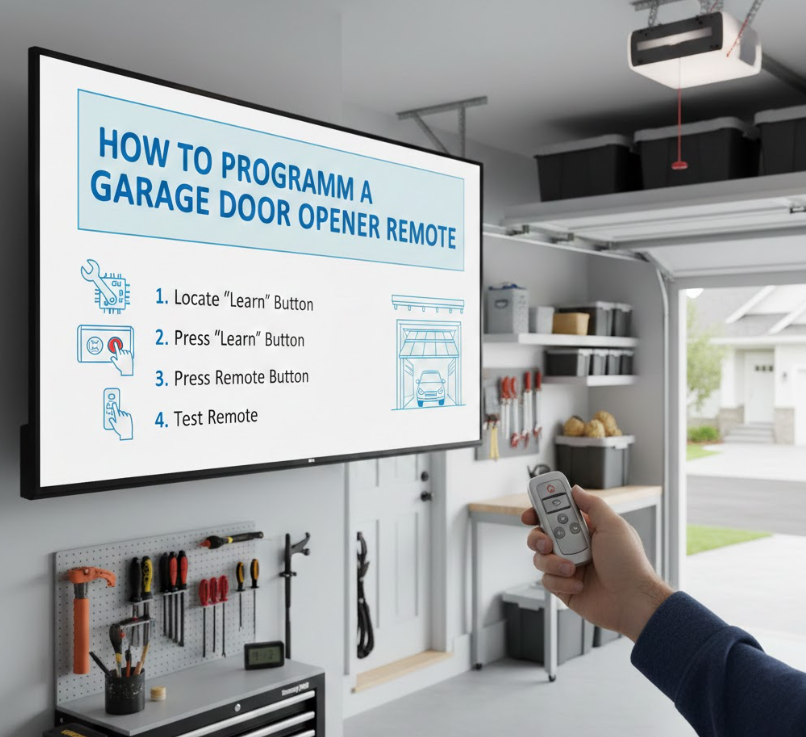
Programming a remote control is the most common task homeowners perform when setting up a garage door opener. Whether you’re replacing a lost remote or adding a new one, the process relies on pairing the remote with the opener’s receiver.
A garage door opener remote is a handheld transmitter that sends a coded radio signal to the opener’s motor unit. Programming aligns the remote’s frequency and encryption with the opener’s internal memory, allowing it to recognize and respond to the signal.
Most modern remotes use rolling-code technology, meaning the access code changes after every use, enhancing security and preventing signal interception.
Detailed Programming Steps and Key Points
• Locate the “Learn” Button on the Opener Unit
The Learn button is typically found on the motor housing near the antenna wire. It may be colored yellow, red, purple, or green depending on the manufacturer. This button activates programming mode, allowing the opener to accept new devices.
• Prepare the Remote Control for Programming
Ensure the remote has fresh batteries and is compatible with your opener model. Weak batteries or incompatible remotes are the most common reasons programming fails.
• Press and Release the Learn Button
Once pressed, the indicator light on the opener will turn on or blink, signaling it is ready to pair with a remote. You usually have 30 seconds to complete the next step.
• Press the Remote Button You Want to Program
Hold the desired remote button for several seconds until the opener light flashes or you hear a clicking sound. This confirms successful pairing.
• Test the Remote Functionality
Stand a safe distance away and press the programmed button. The garage door should open or close smoothly without delay or interruption.
• Secure and Label the Remote
Once programmed, keep the remote in a secure location or label it if multiple remotes are used. This prevents confusion and unauthorized access.
Also Read:- How to Cook Rice: The Complete Expert Guide for Perfect Results Every Time
How to Program a Garage Door Opener LiftMaster
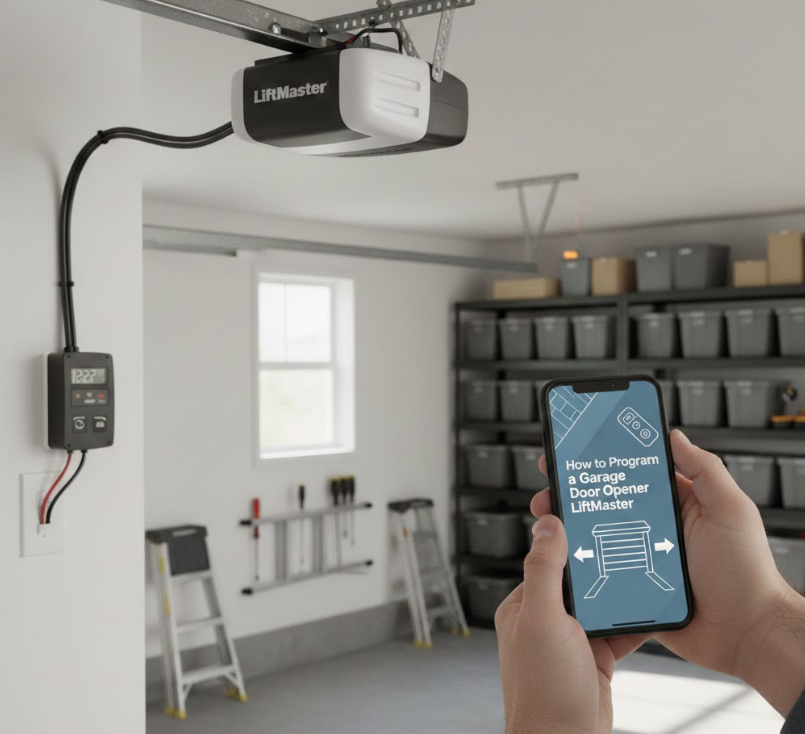
LiftMaster garage door openers are among the most popular residential systems, known for reliability, MyQ smart features, and strong security protocols. Programming them correctly ensures optimal performance and long-term safety.
LiftMaster openers use advanced rolling-code technology and a Learn button system to sync remotes, keypads, and vehicles. The programming process is straightforward but must follow specific timing steps to avoid memory conflicts.
LiftMaster models vary by year, so understanding the color-coded Learn button system is essential.
Detailed Programming Steps and Key Points
• Identify the LiftMaster Learn Button Color
LiftMaster Learn buttons are color-coded—yellow (Security+ 2.0), purple, red, or green. The color determines compatibility with remotes and vehicles, making identification critical.
• Clear Existing Memory if Needed
If you’re reprogramming due to lost remotes, hold the Learn button for 6–10 seconds until the indicator light turns off. This erases all previously programmed devices.
• Activate Programming Mode
Press and release the Learn button once. The indicator light will turn on, indicating the system is ready to accept a new remote or device.
• Program the Remote or Keypad
Press the chosen button on the remote or enter the PIN on the keypad. A blinking light or clicking sound confirms successful programming.
• Confirm Door Operation
Test the system multiple times to ensure consistent response. LiftMaster systems should respond instantly without hesitation.
• Enable Smart Features (Optional)
For MyQ-enabled LiftMaster openers, connect the system to Wi-Fi using the MyQ app to enable remote monitoring and alerts.
Also Read:- How to Bake a Cake: A Complete Expert Guide for Beginners and Home Bakers
How to Program a Garage Door Opener to Your Car
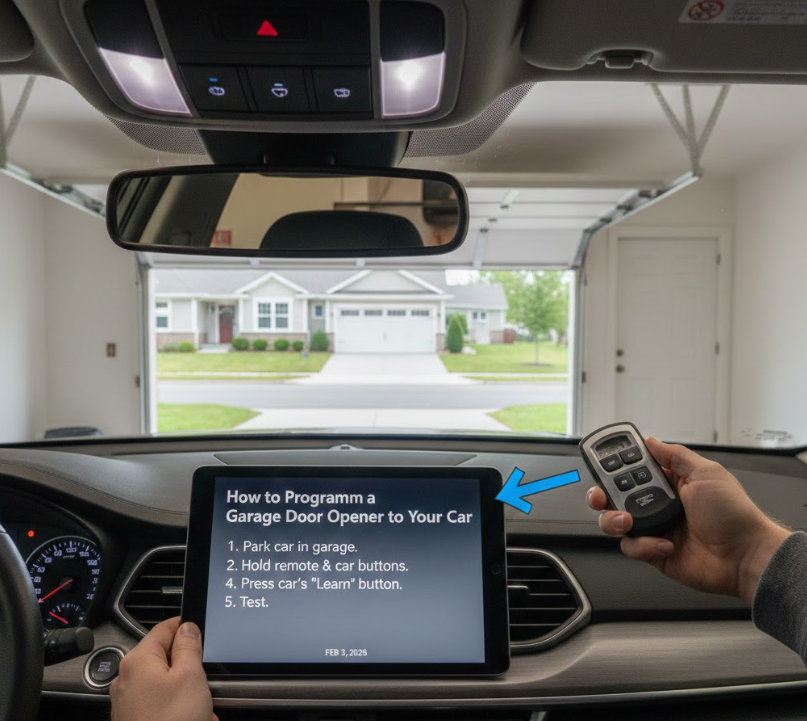
Many modern vehicles come equipped with built-in garage door opener systems such as HomeLink or Car2U. Programming your garage door opener to your car adds convenience by eliminating the need for a handheld remote.
Vehicle-integrated garage door openers use radio frequency signals to communicate with your garage opener. Programming involves syncing the car’s transmitter with the opener’s receiver through a two-step pairing process.
This method enhances convenience while maintaining the same security standards as traditional remotes.
Detailed Programming Steps and Key Points
• Clear Previous Vehicle Programming
Hold the two outer buttons on your car’s HomeLink system until the indicator light begins flashing rapidly. This resets the system and prepares it for new programming.
• Position the Remote Near the Vehicle Controls
Hold your existing garage door remote 1–3 inches from the vehicle’s HomeLink buttons. This allows signal transfer during pairing.
Also Read:- How to Pack a Suitcase: The Ultimate Step-by-Step Expert Guide
How to Program a Garage Door Opener Keypad
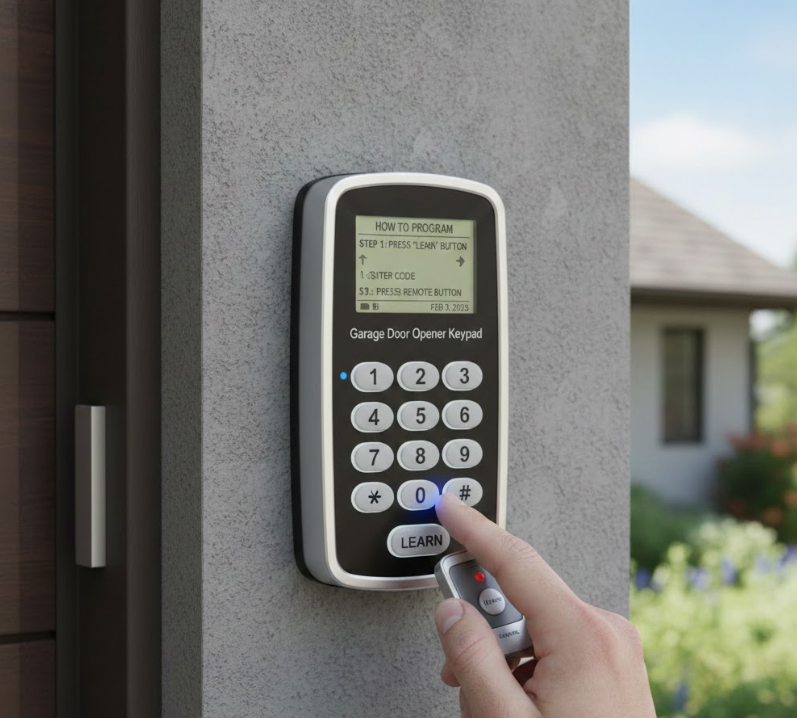
A garage door opener keypad provides keyless entry, allowing access through a secure PIN code. Proper programming ensures only authorized users can operate the door.
A keypad communicates wirelessly with the garage door opener, sending an encrypted code when a valid PIN is entered. Programming involves syncing the keypad with the opener’s memory and setting a secure access code.
Keypads are ideal for families, rental properties, and backup access situations.
Detailed Programming Steps and Key Points
• Locate the Opener’s Learn Button
Just like remotes, keypad programming begins by pressing the Learn button on the opener motor unit to activate pairing mode.
• Enter a Secure PIN on the Keypad
Choose a PIN that is easy to remember but difficult to guess. Avoid common patterns like birthdays or repeated numbers.
• Confirm Programming Entry
Press the Enter or Send button on the keypad. The opener light should flash or click, confirming successful pairing.
• Test the Keypad Function
Enter the PIN and observe door movement. The door should respond promptly without delays.
• Change PIN Periodically for Security
Regularly updating your keypad PIN enhances security, especially after guests or service workers have used it.
• Weatherproof and Maintain the Keypad
Ensure the keypad is mounted securely and protected from extreme weather to prevent signal or battery issues.
Also Read:- How to Make a Degree Symbol: A Complete Guide for All Devices and Platforms
Conclusion: Mastering How to Program a Garage Door Opener
Learning how to program a garage door opener empowers homeowners with convenience, safety, and confidence. Whether you’re syncing a remote, programming a LiftMaster unit, connecting your car, or setting up a keypad, following the correct steps ensures reliable operation and strong security.
By understanding how each component communicates with your opener, you reduce the risk of malfunctions, unauthorized access, and unnecessary repair costs. With this guide, you now have everything you need to program your garage door opener like a professional—quickly, safely, and correctly.
FAQs:
Q1: Can I program a garage door opener without a remote?
Yes, some systems allow programming through keypads or vehicle systems, but an existing remote simplifies the process.
Q2: How long does garage door opener programming take?
Most programming procedures take 5–10 minutes if steps are followed correctly.
Q3: Why won’t my garage door opener accept programming?
Common reasons include incompatible devices, weak batteries, or incorrect Learn button usage.
For More Updates Visit: Biomagazine