
Replacing a kitchen faucet is one of the most impactful yet manageable home improvement projects you can do yourself. Whether your old faucet is leaking, outdated, or simply no longer matches your kitchen’s style, learning how to replace a kitchen faucet can save money, improve water efficiency, and enhance daily usability.
This in-depth guide draws on professional plumbing practices and real-world DIY experience to help homeowners confidently replace a kitchen faucet—covering everything from single-handle faucets and pull-out sprayers to cartridges, hoses, washers, and spouts. By the end of this article, you’ll understand not just how to do it, but why each step matters.
Why Replacing a Kitchen Faucet Matters
Replacing a kitchen faucet is not just a cosmetic upgrade—it directly affects water efficiency, hygiene, and daily convenience. Older faucets often develop internal wear that leads to leaks, reduced pressure, and contamination risks.
A modern kitchen faucet is engineered with better materials, ceramic disc cartridges, and water-saving aerators. According to the U.S. Environmental Protection Agency (EPA), upgrading to WaterSense-labeled faucets can reduce household water usage by up to 30% annually.
Key Benefits of Replacing a Kitchen Faucet
. Improved Water Efficiency
Modern faucets regulate flow more effectively, reducing water waste while maintaining strong pressure. This directly lowers utility bills and supports sustainable water use.
. Elimination of Leaks and Drips
Persistent dripping often comes from worn washers or cartridges. Replacing the faucet removes these hidden failure points entirely.
. Enhanced Kitchen Hygiene
Newer faucets feature antimicrobial finishes and smoother internal pathways that reduce mineral buildup and bacterial growth.
. Better Functionality and Ergonomics
Single-handle designs, pull-down sprayers, and swivel spouts improve ease of use during cooking and cleaning tasks.
. Increased Home Value
Kitchen upgrades, even small ones like a faucet replacement, are proven to increase perceived home value during resale.
. Aesthetic Transformation
A modern faucet can instantly update the look of your kitchen without the cost of a full renovation.
Also Read:- How to Get Rid of Gnats: The Complete Expert Guide for Home, Plants, and Outdoors
Tools and Materials Needed to Replace a Kitchen Faucet
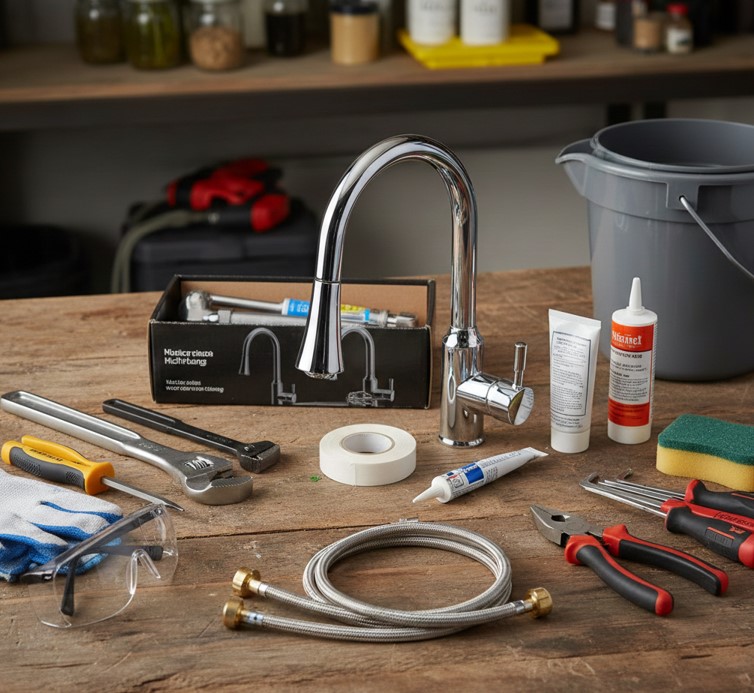
Before starting, assembling the correct tools ensures a smooth installation process and prevents unnecessary delays or damage.
Essential Tools and Supplies
. Adjustable Wrench or Basin Wrench
These allow access to tight mounting nuts beneath the sink, which are often difficult to reach.
. Plumber’s Putty or Silicone Sealant
Used to create a watertight seal between the faucet base and sink surface.
. Bucket and Towels
Residual water in supply lines can spill when disconnected, so preparation prevents water damage.
. New Kitchen Faucet Kit
Includes mounting hardware, supply lines, and manufacturer instructions specific to your model.
. Flashlight or Headlamp
Improves visibility under the sink where lighting is usually limited.
. Safety Gloves and Eye Protection
Protects hands from sharp edges and eyes from debris or splashing water.
Also Read:- How to Clear Cache on iPhone: A Complete, Expert-Backed Guide
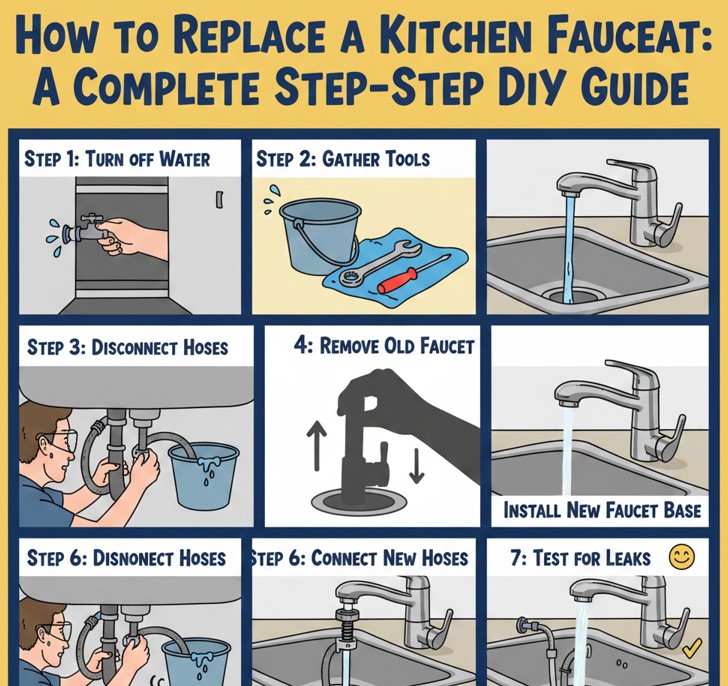
How to Replace a Kitchen Faucet Step by Step

Understanding how to replace a kitchen faucet step by step ensures you follow a logical sequence that avoids leaks, alignment issues, or damaged fittings.
Step-by-Step Faucet Replacement Process
. Shut Off the Water Supply
Locate the hot and cold shutoff valves under the sink and turn them clockwise. Test the faucet to confirm water is fully off.
. Disconnect Supply Lines
Use an adjustable wrench to loosen the nuts connecting water lines to the faucet. Drain remaining water into a bucket.
. Remove the Old Faucet
Unscrew the mounting nuts underneath the sink. Carefully lift the faucet out from above.
. Clean the Sink Surface
Remove old putty, debris, and mineral buildup to ensure a clean mounting surface for the new faucet.
. Install the New Faucet
Insert the faucet through the mounting holes, apply sealant if required, and secure it with mounting hardware.
. Reconnect Water Lines and Test
Attach supply lines, slowly turn the water back on, and check for leaks while running the faucet.
Also Read:- How to Put on a Duvet Cover: A Complete Guide
How to Replace a Kitchen Faucet with a Single Handle
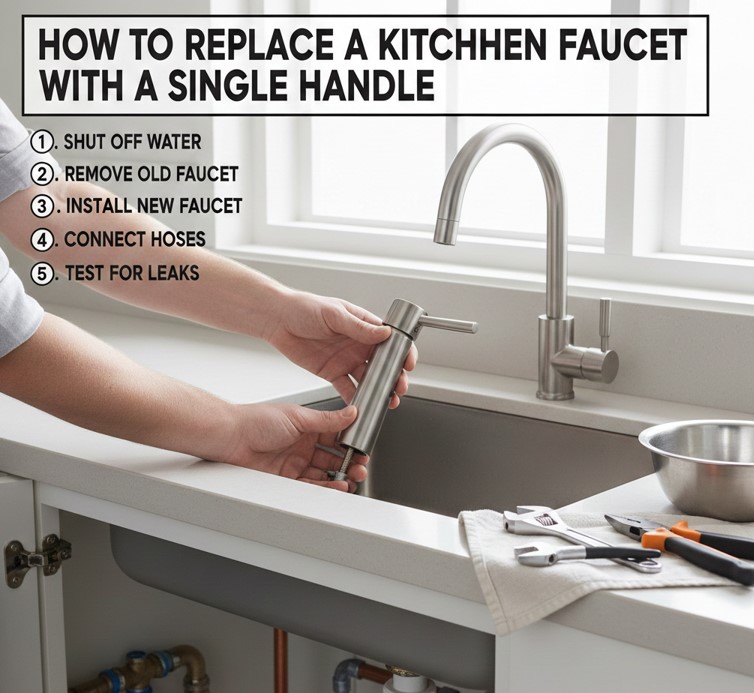
A single-handle kitchen faucet controls both temperature and flow with one lever, making it popular for modern kitchens.
Single-Handle Faucet Replacement Explained
. Understand the Valve Mechanism
Single-handle faucets use a cartridge that mixes hot and cold water internally.
. Align the Faucet Properly
Correct positioning ensures smooth handle movement and even water flow.
. Secure the Mounting Plate
Many single-handle models use deck plates to cover unused sink holes.
. Install the Cartridge Carefully
Improper seating can cause temperature imbalance or leaks.
. Connect Hot and Cold Lines Correctly
Mixing these can result in reversed temperature control.
. Test Temperature and Pressure
Ensure smooth operation before final tightening.
Also Read:- How to Put on Cufflinks: A Step-by-Step Guide
How to Replace a Kitchen Faucet with Sprayer

Faucets with sprayers add versatility but require careful hose routing.
Replacing a Faucet with Sprayer
. Identify the Sprayer Type
Pull-out, pull-down, and side sprayers have different installation requirements.
. Route the Hose Properly
Avoid kinks or sharp bends that restrict water flow.
. Install the Weight Correctly
Pull-out sprayers rely on counterweights for smooth retraction.
. Secure the Diverter Valve
This directs water between faucet and sprayer.
. Check Spray Functionality
Test both stream and spray modes for consistency.
. Inspect for Leaks Under Pressure
Sprayers experience higher stress, making leak testing essential.
Also Read:- How to Make Playdough: The Complete Safe & Creative Guide
How to Replace a Kitchen Faucet Cartridge

The cartridge is the heart of faucet operation and controls water mixing.
Cartridge Replacement Process
. Identify the Correct Cartridge Model
Cartridges vary by manufacturer and faucet type.
. Remove the Handle and Cap
Accessing the cartridge requires careful disassembly.
. Extract the Old Cartridge
Use pliers if necessary, but avoid damaging the valve body.
. Lubricate the New Cartridge
Plumber’s grease ensures smooth operation and longevity.
. Install and Align Properly
Incorrect alignment causes leaks and temperature issues.
. Reassemble and Test
Confirm smooth handle movement and proper water control.
Also Read:- How to Minimize Pores: A Complete Dermatologist-Backed Guide
How to Replace a Kitchen Faucet Hose

Faucet hoses deliver water from supply lines to the spout or sprayer.
Hose Replacement Explained
. Turn Off Water Supply Completely
Prevent sudden pressure release during removal.
. Disconnect the Old Hose
Use caution to avoid damaging fittings.
. Match Hose Length and Diameter
Incorrect sizing affects pressure and reach.
. Install with Proper Threading
Hand-tighten first, then secure gently with a wrench.
. Check Hose Movement
Ensure free movement for pull-out sprayers.
. Pressure Test for Leaks
Run water at full pressure to confirm sealing.
Also Read:- How to Jump Car: The Complete, Safe, Step-by-Step Guide
How to Replace a Kitchen Faucet Washer
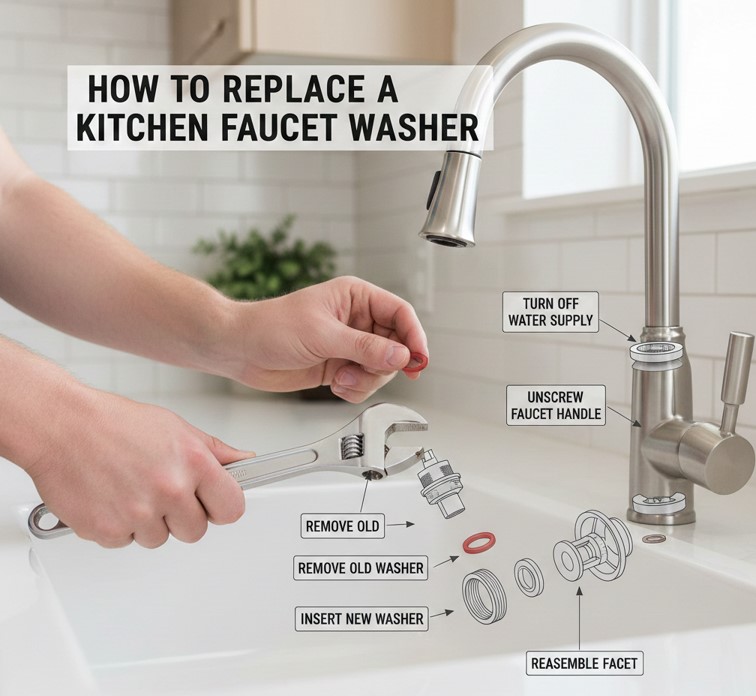
Washers prevent leaks by sealing water flow points.
Washer Replacement Steps
. Identify Washer Location
Commonly found in valve seats or spout bases.
. Remove the Faucet Handle
Access internal components safely.
. Inspect Washer Wear
Cracked or flattened washers cause dripping.
. Replace with Exact Size
Incorrect sizing fails to seal properly.
. Reassemble Carefully
Avoid overtightening which damages washers.
. Test for Drips
Ensure leak-free operation after replacement.
Also Read:- How to Make Matcha Latte: A Complete Beginner-to-Expert Guide
How to Replace a Kitchen Faucet Spout
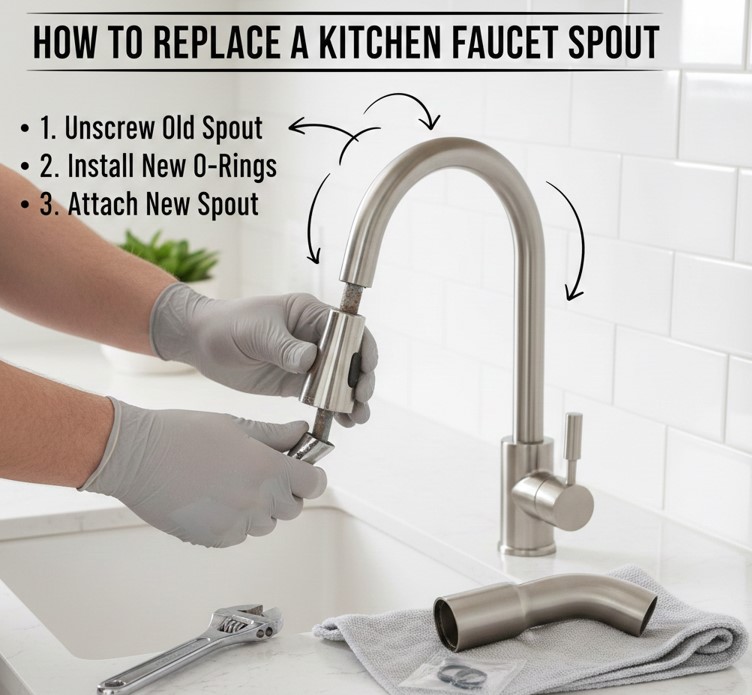
Replacing a spout restores swivel motion and eliminates base leaks.
Spout Replacement Process
. Remove Retaining Nut or Clip
This secures the spout to the faucet body.
. Lift Off the Old Spout
Wiggle gently to release mineral buildup.
. Replace O-Rings
These create a watertight seal at the base.
. Lubricate O-Rings Lightly
Prevents tearing during installation.
. Install the New Spout
Ensure smooth rotation without resistance.
. Test Swivel and Sealing
Confirm no leaks during movement.
Also Read:- How to Make a Fortune Teller: A Complete Step-by-Step Paper Origami Guide
Conclusion
Learning how to replace a kitchen faucet empowers homeowners to maintain their kitchens efficiently while saving money on professional labor. By following proper steps, using quality components, and understanding each faucet part—from cartridges to sprayers—you can achieve professional-level results with confidence.
FAQs
How long does it take to replace a kitchen faucet?
Most DIY installations take 1–2 hours depending on complexity.
Do I need a plumber to replace a kitchen faucet?
No, most homeowners can do it with basic tools and instructions.
Why is my new faucet leaking?
Leaks usually come from loose connections, misaligned cartridges, or damaged washers.
For More Updates Visit: Biomagazine