
Learning how to tie a tie is a timeless skill that every professional, student, and style-conscious individual should master. Whether you’re preparing for a job interview, attending a wedding, giving a presentation, or simply upgrading your personal style, knowing how to tie a tie properly makes a powerful first impression.
A well-tied necktie communicates confidence, attention to detail, and professionalism. According to research published by Princeton University, first impressions are often formed within seconds — and attire plays a major role. A correctly tied tie enhances facial symmetry, frames the collar, and elevates the overall look of a suit or dress shirt.
This comprehensive tutorial follows Google’s Helpful Content guidelines and provides practical, experience-based advice to ensure you not only understand the technique but also apply it confidently.
Understanding the Basics Before You Tie a Tie
Before jumping into techniques, it’s essential to understand the structure of a necktie and how it interacts with your shirt collar and body proportions. Mastering how to tie a tie begins with preparation.
Understanding how to tie a tie begins with knowing the anatomy of the tie, the collar shape, and proportional balance. The tie consists of a wide blade, a narrow blade, and an interlining that gives structure. Correct positioning before knotting ensures symmetry, proper length, and a professional finish.
Build Points
• Know the Parts of a Tie
A standard tie includes the wide end (front blade), narrow end (tail), and keeper loop. The wide end forms the visible knot and should end near the belt buckle. Recognizing these components prevents uneven knots and improper lengths.
• Choose the Right Collar Type
Different collar styles — spread, point, button-down — affect how your knot appears. Wider collars complement Windsor knots, while narrower collars suit simple knots. Matching collar and knot enhances facial balance and style harmony.
• Check Tie Length and Width
Modern ties are typically 57–59 inches long. If you’re taller than average, consider extra-long options. Width also matters: slim ties pair with modern suits, while standard widths match traditional tailoring.
• Stand in Front of a Mirror
A mirror allows precision and symmetry. Even experienced professionals rely on visual alignment to ensure the knot sits centered under the chin.
• Button the Top Shirt Button First
Always secure the top collar button before tying. This ensures the knot forms snugly and maintains structure.
• Set the Wide End Lower Than the Narrow End
Before you begin, position the wide end 8–12 inches lower than the narrow end. This ensures proper finishing length.
Also Read:- How to Reopen Closed Tabs: The Complete 2026 Expert Guide
How to Tie a Tie Easy (Beginner-Friendly Method)
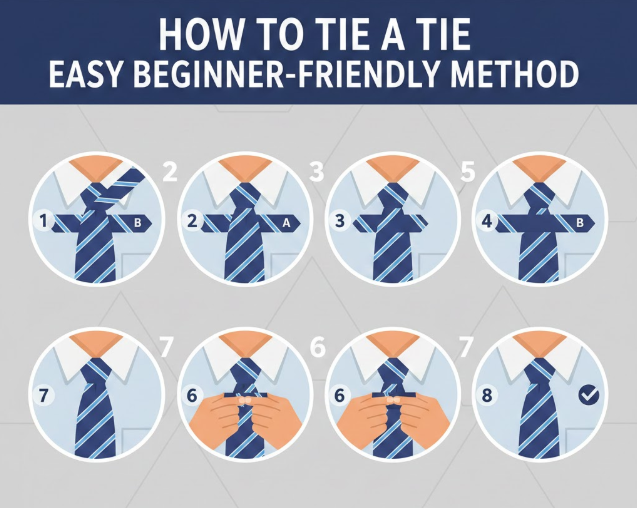
If you’re searching for how to tie a tie easy, this section provides the simplest approach — the Four-in-Hand knot. It’s ideal for beginners and everyday wear.
The easy tie method, commonly known as the Four-in-Hand knot, is a straightforward and slightly asymmetrical knot perfect for daily use. It works well with most collar types and requires minimal steps. This technique is ideal for students, professionals, and anyone learning how to tie a tie for the first time.
Build Points
• Start with Correct Positioning
Place the tie around your neck with the wide end longer. Cross the wide end over the narrow end. This foundation sets up the knot structure.
• Wrap Once Around
Bring the wide end under and around the narrow end one time. Keep the wrap snug but not tight to avoid wrinkles.
• Bring the Wide End Up Through the Neck Loop
Insert the wide end upward through the loop around your collar. Maintain tension with your fingers.
• Pull Down Through the Front Knot
Slide the wide end through the front loop you created. This forms the visible knot.
• Tighten Gradually
Hold the narrow end and gently slide the knot upward toward the collar. Adjust until centered.
• Create a Dimple for Professional Finish
Pinch the fabric just below the knot while tightening to create a subtle dimple — a sign of a well-tied tie.
Also Read:- How to Make Sticky Rice: The Complete Authentic Step-by-Step Guide
How to Tie a Tie in 3 Steps (Quick Method)
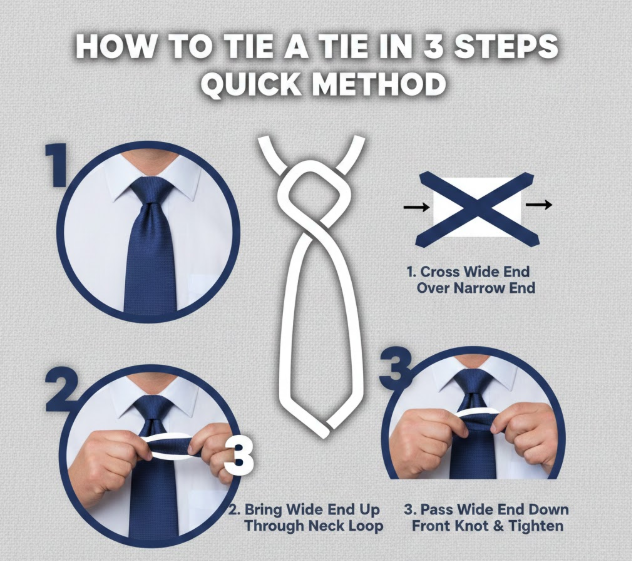
When time is limited, knowing how to tie a tie in 3 steps can save you stress without sacrificing style.
This quick method condenses the tying process into three essential movements: cross, loop, and tighten. It’s perfect for busy mornings and quick wardrobe adjustments. Although simplified, it still delivers a neat, respectable appearance.
Build Points
• Step 1: Cross and Wrap
Cross the wide end over the narrow end and wrap it around once. This forms the structure.
• Step 2: Loop Up and Through
Bring the wide end up behind the knot and through the neck loop. This creates vertical structure.
• Step 3: Slide Down and Tighten
Pull the wide end through the front loop and tighten upward. Adjust alignment.
• Ensure Proper Length
The tip should touch the belt buckle. Too short looks unbalanced; too long appears careless.
• Check Symmetry
Center the knot beneath the chin. Uneven knots affect overall presentation.
• Smooth Wrinkles
Flatten the tie and remove twists for a polished look.
Also Read:- How to Remove Skin Tags at Home: Safe, Natural, and Fast Methods That Work
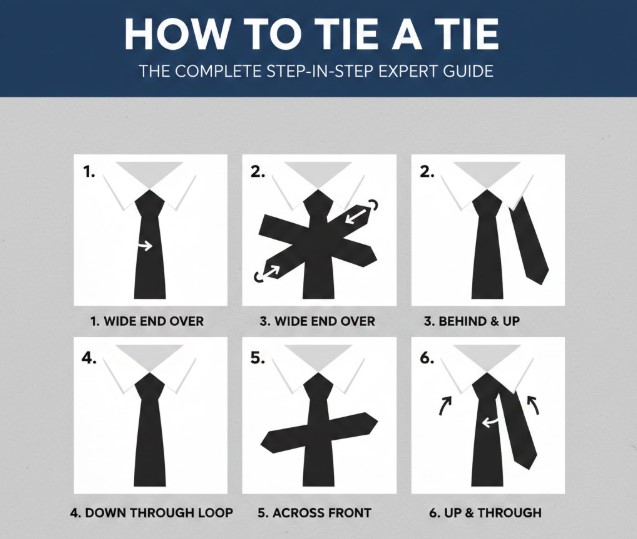
How to Tie a Tie Step by Step (Detailed Professional Method)
Mastering how to tie a tie step by step ensures long-term confidence and consistency.
The step-by-step method focuses on precision, proportion, and technique. It emphasizes proper wrapping direction and balanced tightening. This approach helps develop muscle memory for flawless execution.
Build Points
• Drape and Adjust Length
Position the tie carefully with the wide end extended.
• Cross Wide Over Narrow
Create the first crossing movement.
• Wrap Behind and Around
Loop the wide end around the narrow end.
• Bring Up Through Neck Loop
Lift the wide end behind the knot.
• Insert Through Front Loop
Pull downward gently.
• Tighten and Dimple
Slide knot upward and form signature dimple.
Also Read:- How to Find Y Intercept: A Complete Step-by-Step Mathematical Guide
How to Tie a Tie Windsor (Full Windsor Knot)
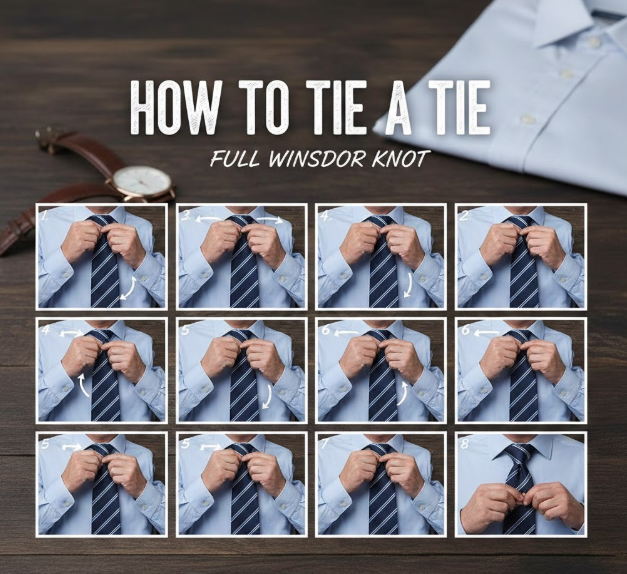
The Windsor knot is bold, triangular, and ideal for formal occasions.
The Windsor knot creates a wide, symmetrical triangle perfect for weddings and business presentations. Popularized by Duke of Windsor, it conveys authority and elegance. It pairs best with spread collars.
Build Points
• Start with Wide End Longer
Full Windsor requires extra length due to double wrapping.
• Cross Over and Loop Up
Bring wide end over narrow and through neck loop.
• Wrap Opposite Side
Cross behind and bring up again.
• Create Horizontal Front Wrap
Bring wide end across the front.
• Pull Down Through Loop
Insert downward through front loop.
• Tighten Symmetrically
Adjust evenly for triangular shape.
Also Read:- How to Make Pesto: The Ultimate Guide to Homemade Pesto Sauce and Pasta
How to Tie a Tie Half Windsor
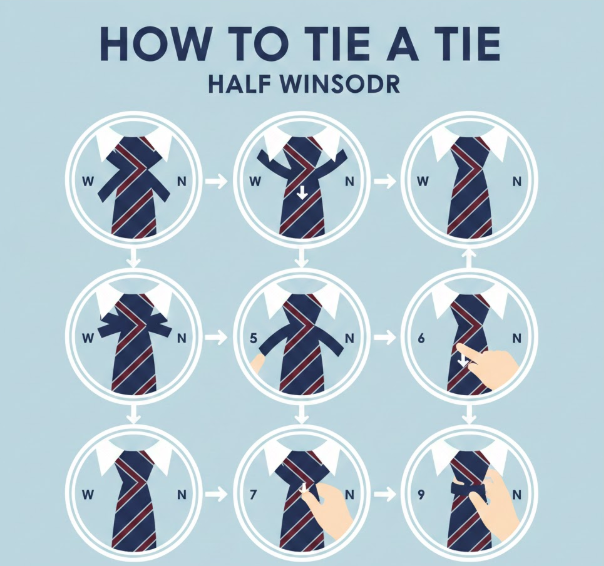
The Half Windsor offers balance between simplicity and formality.
The Half Windsor produces a medium-sized, symmetrical knot suitable for interviews and corporate settings. It is less bulky than the full Windsor but more structured than the Four-in-Hand. It works well with medium-spread collars.
Build Points
• Cross Wide Over Narrow
Begin with standard positioning.
• Loop Under and Up
Bring wide end under and up through neck loop.
• Cross Front
Wrap across front horizontally.
• Insert Through Neck Loop
Bring up behind knot.
• Pull Through Front Loop
Slide downward carefully.
• Center and Dimple
Align and shape neatly.
Also Read:- How to Hard Reset iPhone: Complete Step-by-Step Guide for All Models
How to Tie a Tie Simple (Minimalist Knot)
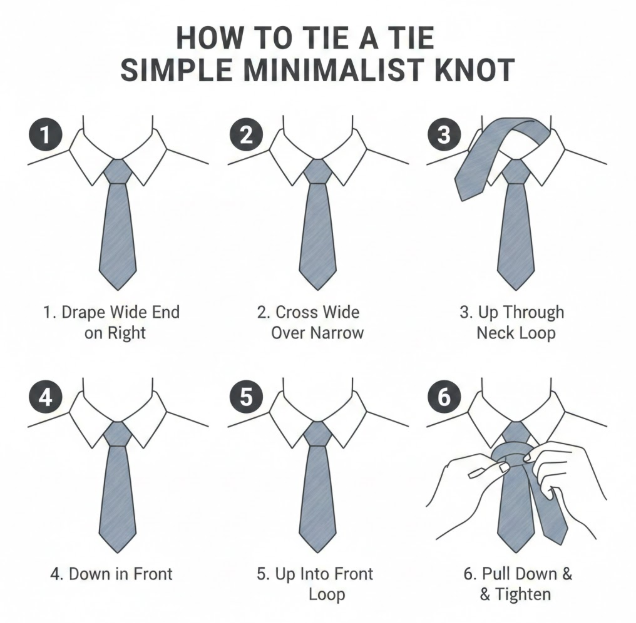
The simple knot, also called the Oriental knot, is compact and efficient. It suits slim ties and smaller collars. This method uses fewer movements but still produces a clean finish.
Build Points
• Reverse starting position
• Cross once only
• Bring up through loop
• Slide down
• Tighten carefully
• Smooth fabric
Also Read:- How to Get Voice Chat on Roblox: Complete Step-by-Step Guide
How to Tie a Tie Fancy (Eldredge & Trinity Knots)
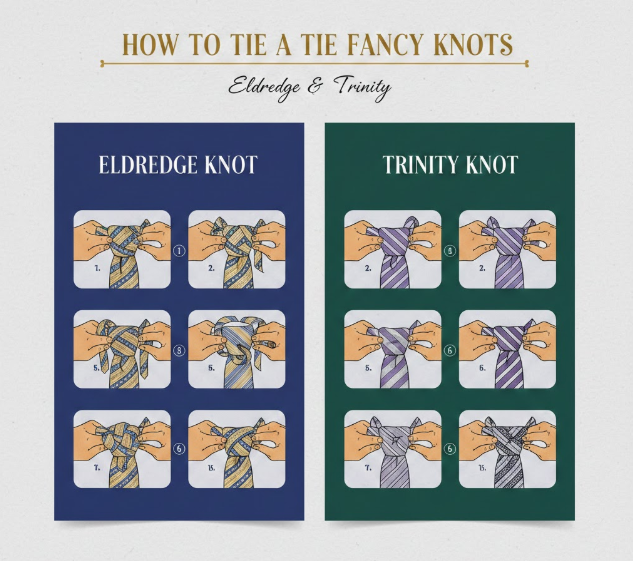
Fancy knots like the Eldredge or Trinity create intricate layered designs. These are best for fashion events, creative industries, and weddings. They require precision and patience.
Build Points
• Use thinner tie
• Follow detailed wrap pattern
• Maintain light tension
• Keep layers flat
• Adjust carefully
• Practice multiple times
Expert Style Tips When Learning How to Tie a Tie
• Match tie width to lapel width
• Choose fabric based on season
• Silk for formal events
• Knit ties for casual settings
• Avoid overly bright patterns in interviews
• Store ties properly to maintain shape
Also Read:- How to Get Rid of a Hickey: Complete Guide to Fast Healing
Conclusion
Knowing how to tie a tie is more than a technical skill — it’s a confidence builder. From the easy Four-in-Hand to the powerful Windsor knot, each technique serves a purpose. With practice, muscle memory develops quickly, allowing you to tie a perfect knot in under a minute.
Whether you need to know how to tie a tie simple, how to tie a tie step by step, or how to tie a tie fancy for a special event, the key is preparation, symmetry, and attention to detail.
Practice regularly, choose the right knot for the occasion, and wear your tie with confidence.
FAQs
What is the easiest way to learn how to tie a tie?
Start with the Four-in-Hand knot. Practice daily for one week to build muscle memory.
How long should my tie be?
The tip should touch your belt buckle.
Is the Windsor knot suitable for interviews?
Yes, especially with spread collars.
How do I keep my tie from loosening?
Ensure proper tightening and collar fit.
Can I tie a tie without a mirror?
Yes, once muscle memory develops.
For More Updates Visit: Biomagazine