

AirPods Pro are among Apple’s most advanced wireless earbuds, offering active noise cancellation, spatial audio, seamless Apple device integration, and exceptional sound quality. However, even premium devices occasionally experience problems such as connection drops, syncing errors, distorted audio, or pairing issues with new devices. Knowing how to reset AirPods Pro is one of the most effective solutions to resolve these issues quickly and safely.
This comprehensive guide explains how to reset AirPodsPro across all models, including AirPods Pro 2, AirPods Pro 3 (where applicable), AirPods Pro Max, factory resets, and removing previous owner connections. Written with real-world experience and technical accuracy, this article follows Apple-approved procedures while remaining easy to understand for everyday users.
Why Resetting AirPods Pro Is Sometimes Necessary
Resetting AirPods Pro clears stored Bluetooth connections, restores default settings, and resolves software-level conflicts that cannot be fixed through normal troubleshooting. Over time, firmware updates, device switching, and background syncing can cause unexpected behavior.
A proper reset can fix issues such as one AirPod not working, pairing failures, charging problems, incorrect noise cancellation behavior, or persistent connection glitches. Resetting does not harm your AirPods Pro and is considered a standard maintenance step recommended by Apple support specialists.
How to Reset AirPods Pro Steps
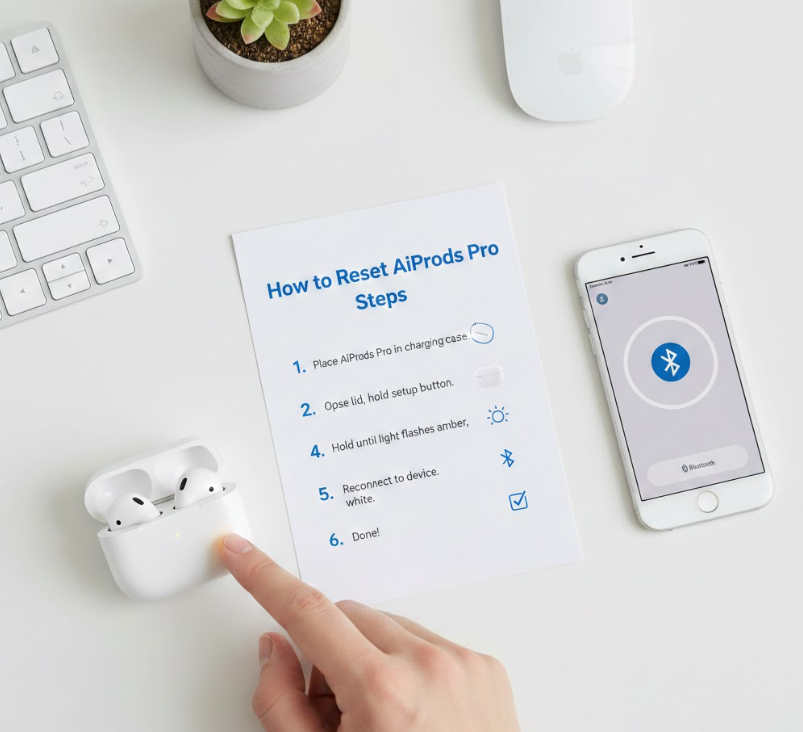
Understanding the correct steps for resetting AirPods Pro ensures that the process is done safely without risking data corruption or connection problems. This method applies to most AirPods Pro models and resolves common Bluetooth and firmware conflicts. Following the correct sequence prevents incomplete resets and pairing errors.
In-Depth Explanation with Build Points
• Place both AirPods Pro inside the charging case
Ensure both earbuds are seated correctly and charging contacts are aligned. The case must recognize both AirPods before a reset can begin, as mismatched placement can interrupt the process and lead to partial resets.
• Close the lid and wait at least 30 seconds
This waiting period allows the internal Bluetooth cache and temporary firmware memory to fully disengage. Skipping this step may prevent the AirPods from resetting properly.
• Open the lid and locate the setup button
The setup button is found on the back of the charging case. It is essential for initiating the reset process and restoring factory pairing behavior.
• Press and hold the setup button firmly
Hold the button for approximately 15 seconds until the status light flashes amber and then white. This indicates the AirPods Pro have been successfully reset.
• Reconnect AirPods Pro to your device
Bring the open case near your iPhone or iPad and follow the on-screen pairing instructions. This establishes a fresh Bluetooth connection.
• Verify performance after reset
Test audio playback, noise cancellation, and microphone functionality to confirm that the reset resolved the issue.
Also Read:- How to Remove Gel X Nails: A Complete Expert Guide
How to Reset AirPods Pro 2
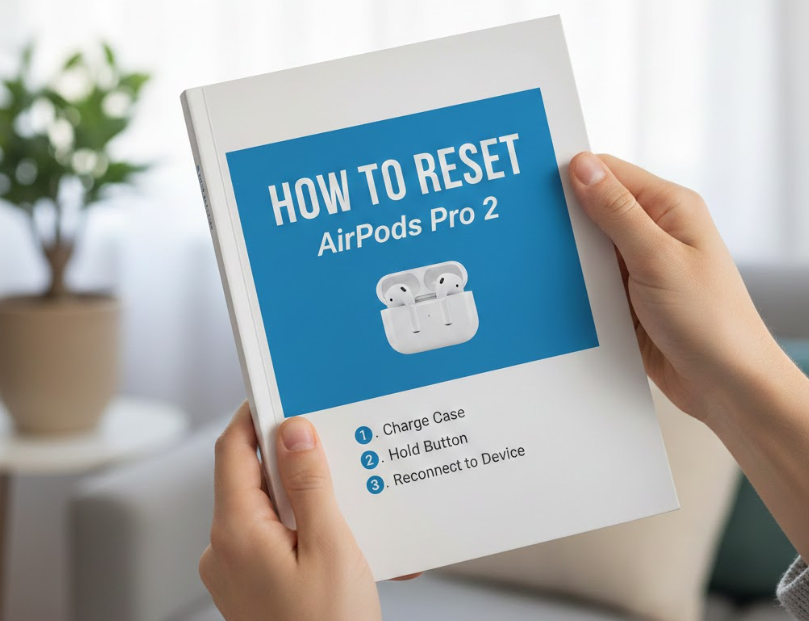
AirPods Pro 2 feature upgraded chips, improved noise cancellation, and adaptive transparency, making proper reset procedures even more important. Resetting AirPods Pro 2 clears advanced spatial audio data and device sync history. This method ensures optimal performance after software conflicts.
In-Depth Explanation with Build Points
• Ensure AirPods Pro 2 are fully charged
Low battery levels can interrupt the reset process, especially with advanced firmware features. A minimum of 50% charge is recommended for reliable resetting.
• Remove AirPods Pro 2 from iCloud device list
Go to your Apple ID settings and remove the AirPods Pro 2 to prevent automatic reconnection during reset.
• Initiate reset using the case button
Press and hold the setup button until the LED flashes amber then white. This indicates the internal H2 chip has cleared previous data.
• Allow firmware recalibration
After resetting, allow a few minutes before reconnecting. This gives the firmware time to recalibrate internal sensors and audio profiles.
• Re-pair with your Apple device
Follow the pairing prompt to reconnect. Personalized spatial audio settings may need to be reconfigured.
• Confirm feature functionality
Test adaptive transparency, noise cancellation, and head tracking to ensure full restoration.
Also Read:- How to Reset CMOS: A Complete Beginner-to-Advanced Guide
How to Reset AirPods Pro 3

Although Apple has not officially released a product labeled “AirPods Pro 3”, many users use this term informally to refer to newer AirPods Pro models that have received firmware updates or hardware refinements. In practice, the reset process for these updated Pro versions follows the same foundational principles used across officially released AirPods Pro generations. By resetting the earbuds correctly, users can resolve pairing conflicts, firmware-related glitches, and compatibility problems that often appear after system updates or device switching.
In-Depth Explanation with Build Points
• Verify model compatibility before starting
To avoid confusion with standard AirPods or AirPods Max, begin by checking the model number in your device’s Bluetooth or Apple ID settings. Confirming the exact model ensures that the reset method you follow aligns with the hardware and firmware capabilities of your AirPods Pro.
• Remove existing Bluetooth connections on all devices
AirPods that remain paired to multiple devices may attempt to auto-connect during the reset process. For best results, delete the AirPods from Bluetooth settings on all phones, tablets, and computers they were previously connected to.
• Initiate the standard reset using the charging case
With both earbuds placed in the charging case, press and hold the setup button on the back until the LED indicator flashes amber and then white. This visual signal confirms that the internal pairing memory has been cleared.
• Clear residual Bluetooth cache on your device
Restarting your phone, tablet, or computer after resetting the AirPods helps remove cached Bluetooth data that could interfere with the new connection.
• Reconnect using Apple’s proximity-based pairing system
Once the device has restarted, bring the open charging case close to your Apple device and follow the on-screen setup instructions. This ensures a clean, stable reconnection.
• Evaluate performance after reconnection
After pairing is complete, test audio playback, microphone clarity, and connection stability over time to confirm that the reset successfully resolved the issue.
Also Read:- How to Replace a Kitchen Faucet: A Complete Step-by-Step DIY Guide
How to Reset AirPods Pro from Previous Owner

AirPods Pro that are still linked to a previous owner may remain restricted because of Apple’s Apple ID and Activation Lock system. In many cases, performing a standard reset will not fully unlock the device unless ownership data is removed first. Completing the proper removal process ensures the AirPods become fully functional and ready for use with a new Apple ID.
In-Depth Explanation with Build Points
• Request iCloud removal from the previous owner
For security reasons, the original owner must sign in to their iCloud account and remove the AirPods from their device list. Activation Lock cannot be bypassed locally, making this step essential.
• Check removal status using the Find My app
After the AirPods are removed, they should no longer appear under the previous owner’s Apple ID in Find My. This confirmation indicates that ownership has been successfully released.
• Complete a full factory reset on the AirPods
With the earbuds inside the charging case, press and hold the setup button until the status light flashes amber and then white. This clears residual pairing and configuration data.
• Restart the Apple device you intend to use
Shutting down and powering the device back on clears cached Bluetooth and iCloud data. This step reduces the risk of connection conflicts during the initial pairing process.
• Pair the AirPods Pro with your Apple ID
With the charging case open, bring it close to your iPhone, iPad, or Mac. Follow the on-screen prompts to link the AirPods to your Apple ID and complete the setup correctly.
• Confirm Find My access under your account
After pairing, open the Find My app and check that the AirPods appear under your devices list. Seeing them there confirms successful ownership transfer and full control.
Also Read:- How to Get Rid of Gnats: The Complete Expert Guide for Home, Plants, and Outdoors
How to Reset AirPods Pro Max
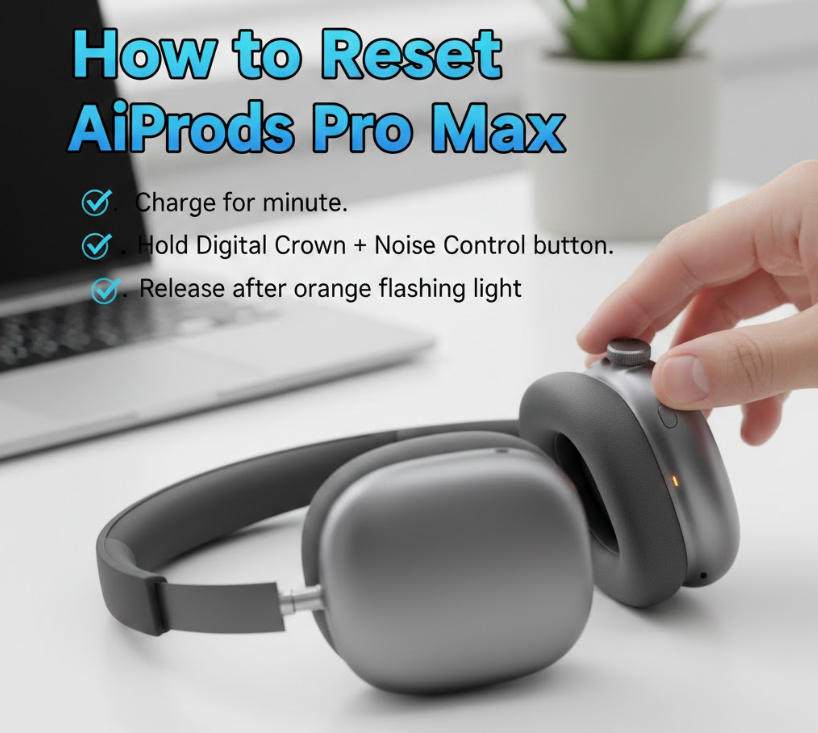
AirPods Pro Max require a unique reset approach because of their over-ear design and the presence of the Digital Crown rather than a traditional charging case button. Performing a proper reset can restore Bluetooth stability, correct audio balance problems, and resolve noise-cancellation glitches. When the correct steps are followed in sequence, the process is completely safe and does not affect firmware or hardware integrity.
In-Depth Explanation with Build Points
• Ensure AirPods Pro Max are sufficiently charged
Before attempting a reset, check that the headphones have adequate battery power. Insufficient charge can interrupt the reset sequence and prevent the indicator light from responding correctly.
• Initiate the reset using physical controls
Press and hold the Digital Crown and the Noise Control button at the same time. Continue holding both controls for approximately 15 seconds to trigger the reset process.
• Watch for the status light sequence
Release the buttons only after the LED flashes amber and then switches to white. This visual pattern confirms that the reset cycle has completed successfully.
• Clear existing Bluetooth connections
Navigate to your device’s Bluetooth settings and remove AirPods Pro Max from the list of paired devices. Clearing old connections prevents automatic reconnection issues.
• Reconnect the headphones to your device
Bring the AirPods Pro Max close to your iPhone, iPad, or Mac and follow the on-screen pairing instructions carefully to establish a fresh connection.
• Evaluate audio and noise-cancellation performance
Once pairing is complete, test sound output, spatial audio, and active noise cancellation to confirm that all features are functioning as expected.
Also Read:- How to Clear Cache on iPhone: A Complete, Expert-Backed Guide
How to Reset AirPods Pro to Factory Settings

Returning AirPods Pro to their factory state places them back in the same condition as when they were first taken out of the box. This approach is especially useful when preparing the earbuds for resale, gifting them to someone else, or troubleshooting persistent performance issues that standard fixes cannot resolve. During a factory reset, all personalized settings, paired devices, and iCloud associations are completely removed.
In-Depth Explanation with Build Points
• Unpair the AirPods from all devices
Start by removing your AirPods Pro from the Bluetooth settings on every device they were connected to. Additionally, make sure they are removed from your iCloud account to prevent automatic reconnections.
• Place the AirPods securely inside the charging case
Check that both earbuds are seated properly and that the lid closes fully. Proper placement ensures the reset can initiate without errors.
• Press and hold the setup button until the LED indicator changes
Continue holding the button until the LED flashes amber and then white. This sequence confirms that the factory reset has been successfully completed.
• Restart any devices previously paired with the AirPods
Turning off and back on your iPhone, iPad, or other devices helps clear cached Bluetooth data that could interfere with new pairing attempts.
• Reconnect the AirPods as a new device
Bring the charging case near your device and follow the on-screen instructions. Treat this like a first-time pairing to ensure clean setup and proper functionality.
• Verify that the reset was successful
After reconnecting, check that no previous settings, customizations, or pairing information remain.
Also Read:- How to Put on a Duvet Cover: A Complete Guide
Conclusion
Understanding how to reset AirPodsPro is an essential skill for maintaining peak performance, resolving connectivity issues, and ensuring seamless device pairing. Whether you are resetting AirPodsPro 2, removing a previous owner’s Apple ID, restoring factory settings, or troubleshooting AirPods Pro Max, following the correct steps protects your investment and improves long-term usability. A proper reset is safe, effective, and often the fastest solution to common problems.
FAQs
Does resetting AirPods Pro delete firmware updates?
No, firmware updates remain intact after a reset.
How often should AirPods Pro be reset?
Only when issues arise; frequent resets are unnecessary.
Will resetting fix one AirPod not working?
Yes, in most cases a reset resolves single-earbud issues.
For More Updates Visit: Biomagazine