
Screenshots are an essential tool for students, professionals, and casual users alike. They allow you to quickly capture your screen for reference, tutorials, or sharing important information. If you’re new to Chromebooks, you might be wondering how to take a screenshot on a Chromebook effectively. Unlike Windows or Mac systems, Chromebooks have their own unique shortcuts and tools designed specifically for Chrome OS.
In this comprehensive guide, we’ll cover everything you need to know about taking screenshots on Chromebooks, including step-by-step methods for different models like HP, Dell, Lenovo, Acer, Asus, and Samsung. Whether you’re using a Chromebook for school, work, or personal use, this guide will ensure you never miss a capture.
Why Screenshots Are Important on a Chromebook
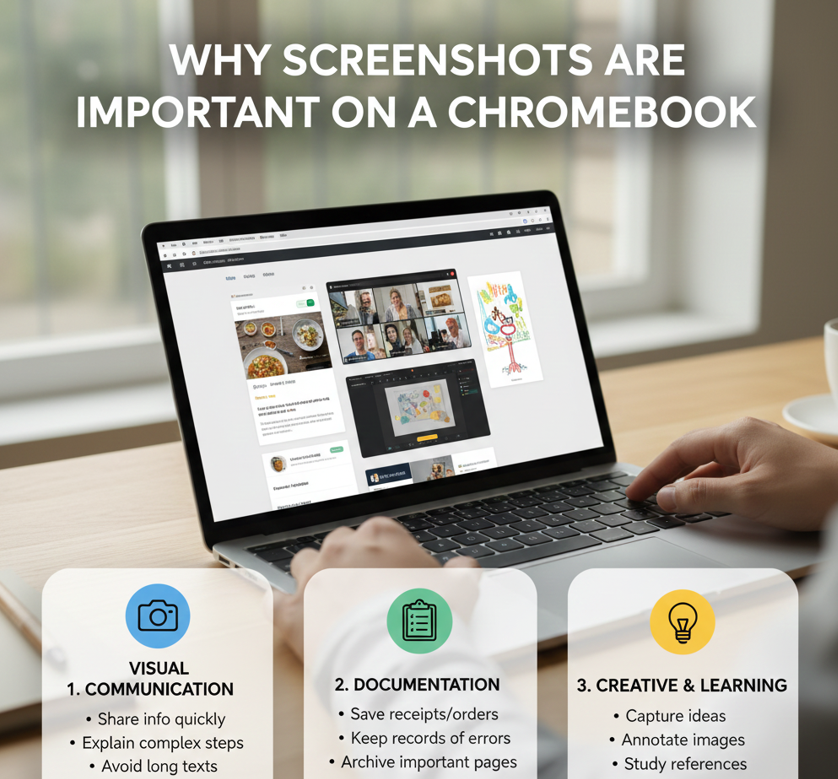
Screenshots are more than just a convenience—they are a powerful productivity tool. Some key reasons to know how to take a screenshot on a Chromebook include:
- Quick Information Capture:
Screenshots allow you to instantly capture what’s on your screen without needing to copy or type information manually. This is especially useful for saving receipts, online forms, or messages. - Easy Sharing:
With a screenshot, you can share content with friends, colleagues, or teachers quickly via email, chat apps, or social media. It’s faster than describing what’s on your screen. - Documenting Errors or Bugs:
If you encounter a problem or error on your Chromebook, a screenshot can help you document it and share it with tech support for troubleshooting. - Learning and Education:
Screenshots are valuable for students to save lecture slides, diagrams, or examples from online learning platforms. They make revisiting important material easier. - Creating Tutorials and Guides:
Screenshots are essential for step-by-step guides or tutorials, allowing others to follow exactly what you see on your screen. - Memory Aid:
Capturing a screenshot of important information (like schedules, notes, or reminders) helps you remember and access it later without needing to write it down. - Proof and Reference:
Screenshots act as proof of transactions, messages, or online activities, which can be used for personal reference, work, or legal matters. - Visual Communication:
Sometimes it’s easier to show someone what you mean with a visual rather than explaining with words. Screenshots enhance clarity in communication.
According to a study by TechRepublic, over 60% of users rely on screenshots for documentation and troubleshooting, highlighting their importance in both professional and educational contexts.
Also Read: How to Check Engine Oil: The Complete Guide for Car Owners
Basic Chromebook Screenshot Methods

Chromebooks are designed with simplicity in mind, and taking a screenshot is no exception. Here’s how to do it using standard methods.
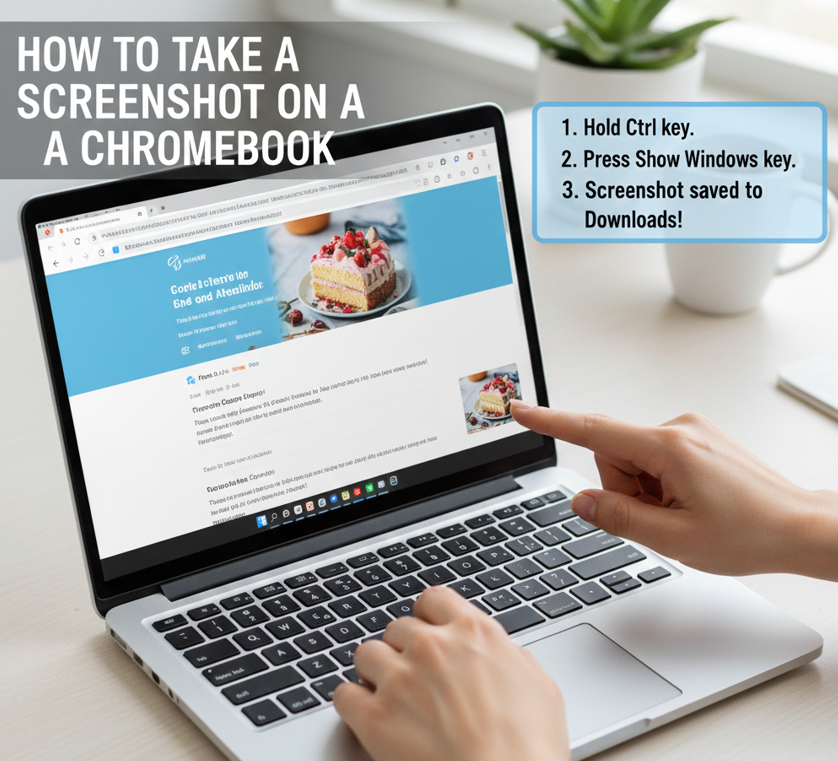
How to Take a Screenshot on a Chromebook Laptop
- Full-Screen Screenshot
- Partial Screenshot
- Press Ctrl + Shift + Show Windows key.
- The cursor changes to a crosshair, allowing you to click and drag to select a specific area.
- Release the mouse to capture only the selected part.
- Saved automatically in Downloads.
- Window Screenshot
- Press Ctrl + Alt + Show Windows key.
- Click on the window you want to capture.
- Captures only that specific window, not the entire screen.
- Saved in Downloads automatically.
- Using the Stylus (on touchscreen Chromebooks)
- Tap the Stylus icon → select Take Screen Capture.
- Choose between full screen, partial screen, or window capture.
- Clipboard Copy (without saving)
- Add Ctrl + Shift before any screenshot method to copy it to clipboard instead of saving it.
- Allows you to paste directly into documents or emails.
- Accessing Screenshots
- All saved screenshots go to the Downloads folder.
- You can view them in the Files app or drag them to Google Drive.
Also Read: How to Delete Instagram Account: Complete Step-by-Step Guide
How to Take a Screenshot on Chromebook by Manufacturer

Different Chromebook models may have slightly varied keyboards, but the steps are mostly consistent. Here’s a breakdown for popular brands.
How to Take a Screenshot on a Chromebook HP
- Press Ctrl + Show Windows for full-screen capture.
- For partial screenshots, use Ctrl + Shift + Show Windows.
- HP Chromebooks may also allow a gesture-based capture using the touchpad: swipe down with three fingers for a screenshot.
How to Take a Screenshot on a Chromebook Dell
- Dell Chromebooks follow standard Chrome OS shortcuts: Ctrl + Show Windows.
- For quick sharing, use the built-in Screenshot app accessible from the launcher menu.
How to Take a Screenshot on a Chromebook Lenovo
- Lenovo users can use Ctrl + Show Windows for full screenshots.
- Lenovo’s Chromebook keyboard layout is slightly different; locate the Show Windows key on the top row.
How to Take a Screenshot on a Chromebook Acer
- Acer Chromebooks support both full and partial screenshots.
- Shortcut keys: Ctrl + Show Windows for full, Ctrl + Shift + Show Windows for partial.
- Acer devices may also support screenshot gestures on the touchpad.
How to Take a Screenshot on a Chromebook Asus
- Asus Chromebooks follow the standard Chrome OS shortcut methods.
- Some Asus devices have dedicated screenshot buttons on certain models for easier access.
How to Take a Screenshot on a Chromebook Samsung
- Samsung Chromebooks may offer hardware buttons for capturing screens.
- Use Ctrl + Show Windows or Ctrl + Shift + Show Windows for full and partial screenshots respectively.
Also Read: How to Change a Tire: The Complete Step-by-Step Guide
Chromebook Screenshot Tools and Apps

In addition to keyboard shortcuts, Chromebooks offer several tools for capturing screenshots more efficiently:
Built-In Screenshot App
- Access via Search/Launcher key → type “Screenshot”.
- Offers options for full-screen, partial, or window capture.
- Screenshots can be automatically saved to Google Drive for easy sharing.
Extensions and Third-Party Apps
- Nimbus Screenshot & Screen Video Recorder: Capture, edit, and annotate screenshots.
- Lightshot: Simple tool for partial screen capture and cloud sharing.
- Awesome Screenshot: Includes annotation and sharing features.
Also Read: How to Get Blood Out of Carpet: Expert Methods for Quick & Effective Stain Removal
How to Take a Screenshot on a Chromebook for School

Chromebooks are widely used in schools due to their portability and cloud integration. Students may need to capture:
- Capture online lessons, assignments, or instructions.
- Save important notes from Google Classroom or educational websites.
- Share work or errors with teachers for help and feedback.
- Keep visual records for study or revision.
- Take a Full-Screen Screenshot
- Press Ctrl + Show Windows.
- The Chromebook captures everything visible on the screen.
- Useful for saving complete assignments, slides, or test instructions.
- Take a Partial Screenshot
- Press Ctrl + Shift + Show Windows.
- Click and drag to select only the required area.
- Ideal for capturing specific questions, diagrams, or notes.
- Take a Screenshot of a Specific Window
- Press Ctrl + Alt + Show Windows .
- Click on the open window you want to capture.
- Helpful when working with multiple tabs or apps.
- Using the Screenshot Tool (Screen Capture Toolbar)
- Press Ctrl + Shift + Show Windows to open the toolbar.
- Choose between full screen, partial screen, or window screenshot.
- Easy for students who prefer visual tools.
- Where Screenshots Are Saved
- Screenshots are automatically saved in the Downloads folder.
- You can move them to Google Drive or organize them into subject folders.
- How to Find and Use Screenshots
- Open the Files app to access screenshots.
- Rename files to match subjects like Math, Science, or History.
- Upload screenshots to Google Classroom or email them to teachers.
- Tips for School Use
- Capture clear and readable content only.
- Avoid saving unnecessary personal information.
- Keep screenshots organized by subject and date.
- Use screenshots only for learning and school-related purposes
Also Read: How to Avoid Dry Socket After Wisdom Teeth Removal
Chromebook Screenshot FAQ
How to Take a Screenshot on Chromebook Keyboard
- Use Ctrl + Show Windows for full-screen capture.
- Use Ctrl + Shift + Show Windows for partial capture.
Easy How to Take a Screenshot on Chromebook
- The fastest method: Ctrl + Show Windows.
- For touch-enabled Chromebooks, try three-finger swipe gestures for one-step capture.
Google How to Take a Screenshot on Chromebook
- Google provides official instructions via the Chrome OS Help Center for beginners.
- Visit Google Chromebook Help for model-specific guidance.
How to Take a Screenshot on a Chromebook 11
- Chromebook 11 models are compact; use Ctrl + Show Windows to capture the screen.
- Some school-issued models may disable certain shortcuts—check with your IT administrator.
How to Take a Screenshot on Chromebook Buttons
- Older or specialized Chromebooks may have dedicated screenshot buttons on the keyboard.
- Pressing the button alone usually captures the full screen; combine with Shift for partial capture.
Advanced Screenshot Techniques

Annotating and Editing Screenshots
- Chrome OS allows basic editing in the Files app.
- For more advanced edits, consider Lightshot or Nimbus Screenshot.
Screenshot Shortcuts for Tablets and Touchscreen Chromebooks
- Press Power + Volume Down buttons simultaneously for a screenshot.
- Works like a standard Android device, ideal for convertible Chromebooks.
Capturing Scrolling Screenshots
- Third-party apps like Nimbus can capture entire web pages.
- Useful for research, long articles, or presentations.
Also Read: How to Smoke a Cigar: A Complete Guide for Beginners
Tips for Organizing and Managing Chromebook Screenshots
- Automatic Save Location: Most screenshots go to Downloads, but you can move them to Google Drive.
- Naming Convention: Rename screenshots immediately for easy retrieval.
- Batch Management: Use Chrome OS’s Files app to create folders by project, date, or subject.
Common Chromebook Screenshot Issues
- Screenshot key not working: Ensure you’re pressing the correct Show Windows key.
- No permission to save: Check your Chrome OS security settings.
- Third-party app not installing: Only install apps from Chrome Web Store or Google Play Store.
Conclusion
Knowing how to take a screenshot on a Chromebook is essential for productivity, schoolwork, and sharing information efficiently. From full-screen captures to partial and window-specific screenshots, Chromebooks provide multiple tools to meet your needs.
Whether you are using a HP, Dell, Lenovo, Acer, Asus, or Samsung Chromebook, mastering these shortcuts ensures that you can quickly capture, annotate, and share your screen content. Combine keyboard shortcuts with apps like Nimbus or Lightshot, and your screenshot workflow becomes seamless and professional.
Make screenshot-taking a part of your Chromebook routine, and enjoy organized, easily shareable captures every time.
FAQs About Chromebook Screenshots
Q1: How do I take a screenshot on a Chromebook laptop?
Use Ctrl + Show Windows for full-screen or Ctrl + Shift + Show Windows for partial capture.
Q2: Can I take a screenshot on a Chromebook without a keyboard?
Yes, use Power + Volume Down on touchscreen models or the Screenshot app.
Q3: Where do Chromebook screenshots go?
By default, they are saved in the Downloads folder, but you can move them to Google Drive.
Q4: How do I capture a specific window?
Press Alt + Show Windows to capture the active window.
Q5: Are there apps to annotate Chromebook screenshots?
Yes, Nimbus Screenshot, Lightshot, and Awesome Screenshot allow annotation and editing.
For More Updates Visit: Biomagazine