
If you’ve ever enjoyed fresh seafood at a coastal restaurant, you’ve probably wondered how to shuck an oyster yourself. Learning how to shuck an oyster at home is a practical culinary skill that saves money, enhances flavor control, and elevates your hosting game. Whether you want to know how to shuck an oyster step by step, how to shuck an oyster without an oyster knife, or even how to shuck an oyster with a butter knife, this comprehensive guide will teach you everything you need.
Shucking oysters may seem intimidating, but with proper technique, the right tools, and safe handling practices, it becomes a simple and satisfying kitchen skill. According to the U.S. Food and Drug Administration, safe seafood handling and proper storage significantly reduce foodborne illness risks, making technique just as important as taste.
Let’s dive into this complete, expert-level guide on how to shuck an oyster safely and efficiently.
Understanding Oysters Before You Shuck
Before learning how to shuck an oyster, it’s essential to understand oyster anatomy, freshness indicators, and safety standards. Oysters are bivalve mollusks with two hinged shells, and the edible portion is attached to the inside by a muscle called the adductor muscle.
What Makes Oyster Shucking Unique
• Oysters are tightly sealed by a powerful adductor muscle, which means learning how to shuck an oyster involves precision rather than brute force. The goal is to sever this muscle cleanly without spilling the oyster liquor (the flavorful natural juice inside).
• The hinge is the strongest point of the shell and the primary entry point when learning how to shuck an oyster step by step. Proper leverage at the hinge reduces risk of injury and keeps the oyster intact.
• Unlike clams or mussels, oysters have uneven shells. The top shell (flatter) and bottom shell (cupped) must be identified before starting, especially when learning how to shuck an oyster at home safely.
• Fresh oysters should be tightly closed. If an oyster remains open after tapping, discard it. This is a key food safety principle recommended by the Centers for Disease Control and Prevention.
• The oyster liquor inside the shell is a sign of freshness. Losing this liquid during shucking reduces flavor and presentation quality.
• Proper storage at 35–40°F (1.6–4.4°C) before shucking ensures safety and maintains peak taste, especially when preparing oysters at home.
Essential Tools for Shucking Oysters
When learning how to shuck an oyster, using the correct tools ensures safety and efficiency.
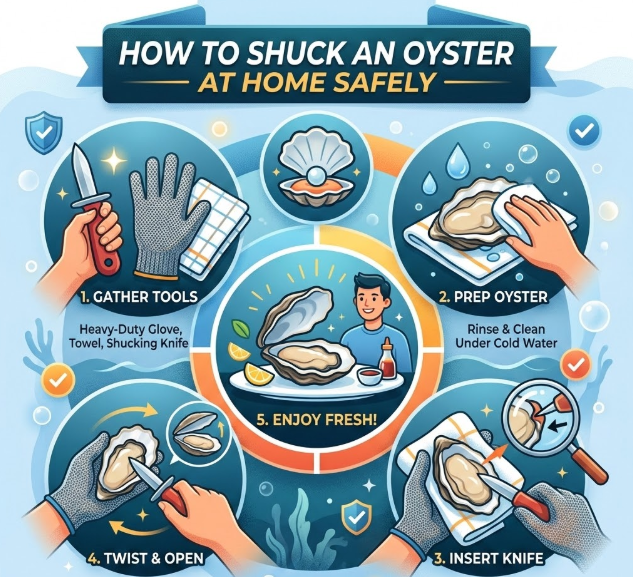
Must-Have Equipment for Safe Shucking
• Oyster Knife: A short, thick-bladed knife designed specifically for shucking. It allows controlled pressure at the hinge without bending. Knowing how to shuck an oyster with the right knife reduces risk of slipping.
• Cut-Resistant Glove: Protects your non-dominant hand holding the oyster. Many beginners learning how to shuck an oyster at home underestimate the importance of hand protection.
• Kitchen Towel: If you don’t have gloves, wrap the oyster in a thick towel. This prevents slipping and protects against sharp shell edges.
• Butter Knife (Alternative Tool): If you’re exploring how to shuck an oyster with a butter knife, choose a sturdy, non-flexible one. It won’t be as efficient as an oyster knife but can work in controlled situations.
• Flat Surface: Always shuck on a stable counter. Avoid holding oysters mid-air while learning how to shuck an oyster without a shucker.
• Bowl for Shells: Keep a discard bowl nearby to maintain hygiene and workflow efficiency.
Also Read:- How to Find Volume: The Complete Step-by-Step Guide
How to Shuck an Oyster Step by Step
This section provides a clear, professional method for how to shuck an oyster step by step.
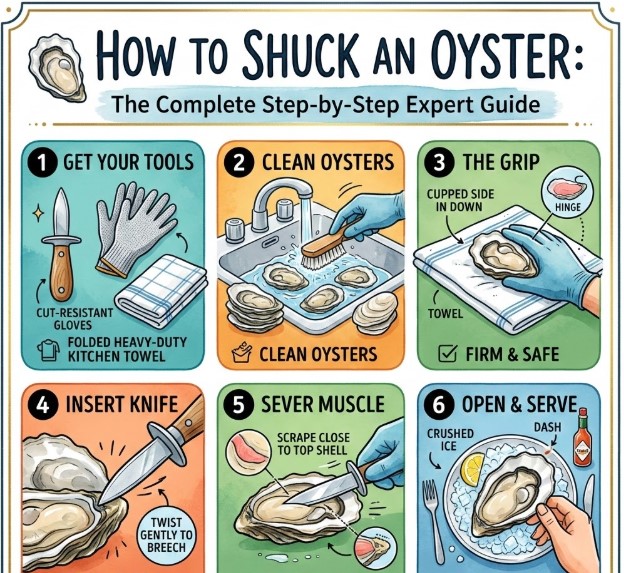
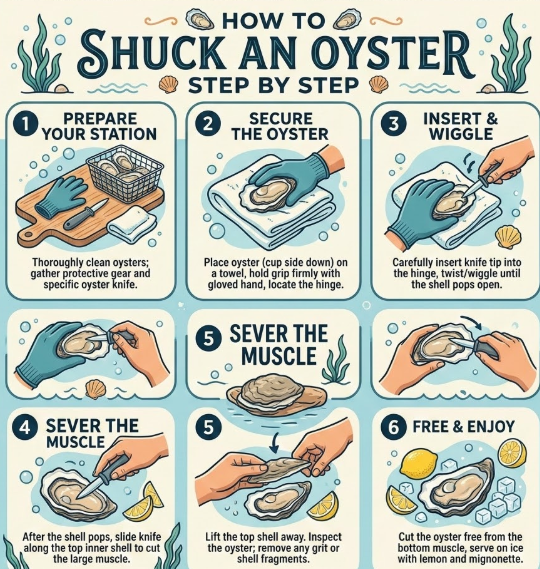
Step-by-Step Oyster Shucking Process
• Position the Oyster Correctly: Place the oyster flat-side up with the hinge facing you. This positioning ensures you’re entering at the strongest but safest point. Learning how to shuck an oyster begins with orientation.
• Insert the Knife at the Hinge: Gently wiggle the knife into the hinge. Avoid stabbing motions. Controlled pressure is key when practicing how to shuck an oyster at home.
• Twist, Don’t Pry: Once inserted slightly, twist the knife like turning a key. This pops the hinge open without cracking the shell unevenly.
• Slide Along the Top Shell: Move the knife along the inside of the top shell to cut the adductor muscle cleanly. This is the critical step in how to shuck an oyster without damaging the meat.
• Remove the Top Shell Carefully: Lift it off slowly to avoid spilling liquor. Inspect for shell fragments and remove them.
• Loosen the Bottom Muscle: Run the knife under the oyster to detach it from the bottom shell while keeping it in place for presentation.
Also Read:- How to Train Your Dragon: Homecoming – Complete Guide
How to Shuck an Oyster at Home Safely
Learning how to shuck an oyster at home requires attention to hygiene, temperature, and technique.
Home Shucking Safety Guidelines
• Keep Oysters Cold: Store on ice before shucking. Cold oysters are safer and slightly easier to open because the muscle is firm.
• Work in Small Batches: Don’t shuck all oysters hours before serving. Freshness matters when learning how to shuck an oyster for guests.
• Check for Off Smells: A fresh oyster smells like the ocean. A strong fishy odor means discard immediately.
• Clean the Shell Exterior: Scrub shells under cold water before opening. This prevents bacteria from entering during shucking.
• Avoid Cross-Contamination: Use separate utensils for raw seafood and other foods.
• Serve Immediately: Once shucked, serve within 30 minutes for best flavor and safety.
Also Read:- How to Wash Locs: The Complete Expert Guide for Healthy, Clean, and Strong Dreadlocks
How to Shuck an Oyster Without an Oyster Knife
If you don’t have specialized tools, here’s how to shuck an oyster without an oyster knife.
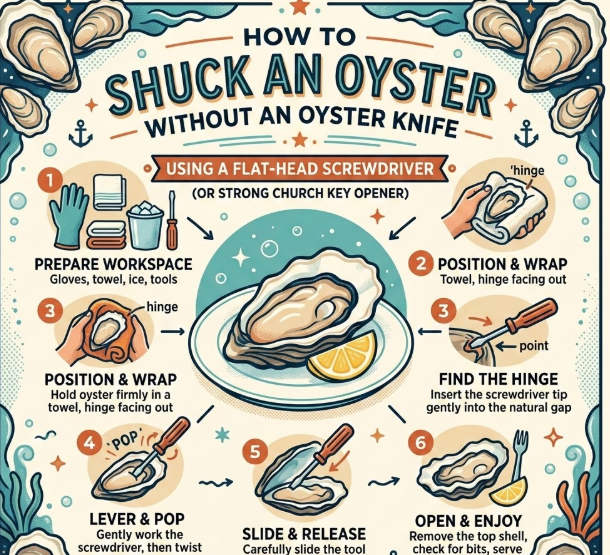
Alternative Shucking Methods
• Use a Sturdy Butter Knife: Insert into the hinge and twist gently. This method works but requires more patience and pressure control.
• Flathead Screwdriver (Emergency Only): Though possible, it increases shell breakage risk. Use caution and food-safe cleaning practices.
• Protect Your Hands: Without a proper knife, slipping risk increases. Always wrap in a towel.
• Focus on the Hinge: Alternative tools work best at the hinge point, not along the side seam.
• Apply Gradual Pressure: Never force entry aggressively. Shell fragments can contaminate the oyster.
• Inspect Carefully: After opening, check thoroughly for broken shell pieces before serving.
Also Read:- How to Wash Running Shoes: The Complete Expert Guide for Safe, Effective Cleaning
How to Shuck an Oyster with a Butter Knife
For beginners wondering how to shuck an oyster with a butter knife, technique matters more than strength.
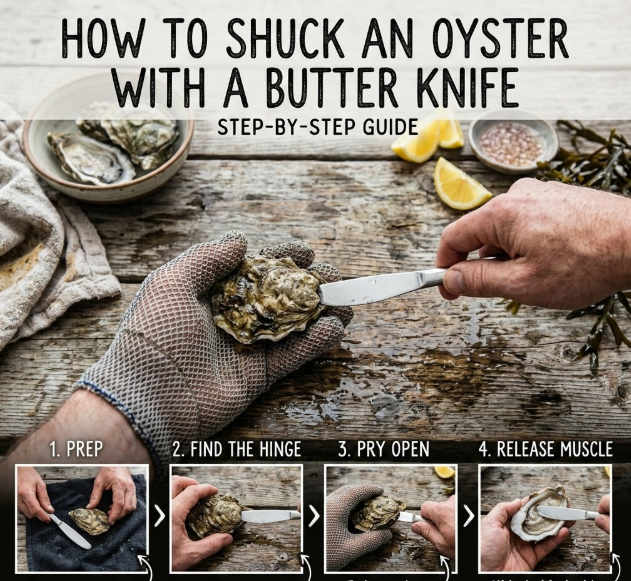
Butter Knife Technique Explained
• Choose a thick, rigid butter knife. Thin or flexible knives bend easily and increase injury risk.
• Insert at the hinge and wiggle until slight entry is achieved.
• Twist gently to pop the hinge rather than prying sideways.
• Slide the blade across the top shell to cut the muscle.
• Lift carefully and clean fragments.
• Finish by detaching bottom muscle without flipping the oyster.
Also Read:- How to Water Mums: The Complete Expert Guide for Healthy, Long-Lasting Blooms
Common Mistakes When Learning How to Shuck an Oyster
• Applying excessive force instead of controlled twisting.
• Using thin knives that bend or snap.
• Failing to protect hands with gloves or towels.
• Not checking freshness before serving.
• Losing oyster liquor due to rough handling.
• Serving oysters too long after shucking.
Also Read:- How to Make Google My Default Browser: The Complete 2026 Guide
Nutritional and Culinary Benefits of Fresh Oysters
Oysters are nutrient-dense and rich in zinc, vitamin B12, and omega-3 fatty acids. The National Institutes of Health highlights zinc as critical for immune support, and oysters are among the richest natural sources.
Freshly shucked oysters offer superior flavor compared to pre-shucked varieties. Their briny, sweet profile varies by region, including Atlantic, Pacific, and Gulf varieties.
Also Read:- How to Braid Hair: The Complete Step-by-Step Guide for Beginners, Men, and Advanced Styles
Serving and Presentation Tips After Shucking
• Serve on crushed ice to maintain temperature.
• Add lemon wedges, mignonette sauce, or hot sauce.
• Keep shells level to retain liquor.
• Pair with sparkling wine or crisp white wine.
• Discard any oysters that dry out quickly.
• Present within 30 minutes of opening.
Also Read:- How to Call Private: The Complete Guide to Hiding Your Caller ID Safely and Legally
Conclusion
Learning how to shuck an oyster is a rewarding culinary skill that combines precision, safety, and appreciation for fresh seafood. Whether you’re practicing how to shuck an oyster step by step, exploring how to shuck an oyster at home, or figuring out how to shuck an oyster without an oyster knife, success comes from patience and proper technique.
With the right tools, attention to food safety, and steady hands, you can confidently serve restaurant-quality oysters from your own kitchen.
FAQs
Can I shuck oysters ahead of time?
It’s best to shuck oysters right before serving. If necessary, keep them refrigerated on ice and covered with damp paper towels for up to 24 hours.
Is it safe to eat raw oysters at home?
Yes, if sourced from reputable suppliers and stored properly. High-risk individuals should consult medical advice.
What if I can’t open the hinge?
Try repositioning your knife and applying gentle twisting pressure rather than forcing entry.
How do I know if an oyster is bad?
A strong fishy smell, dry interior, or open shell that doesn’t close when tapped indicates spoilage.
Can I cook oysters instead of eating raw?
Absolutely. Grilling, baking, or frying are excellent alternatives if you prefer cooked seafood.
For More Updates Visit: Biomagazine