
If you’ve ever searched for how to draw a pumpkin, you’re not alone. Pumpkins are one of the most popular drawing subjects, especially during autumn and Halloween. Whether you want a realistic pumpkin sketch, a cute cartoon pumpkin, or a detailed jack-o’-lantern, learning the right techniques can transform your artwork from basic to impressive.
Drawing a pumpkin might seem simple because of its round shape, but achieving natural curves, dimensional shading, and expressive details requires understanding structure, proportion, and light. In this complete guide, you’ll learn how to draw a pumpkin easy, explore how to draw a pumpkin step by step, and master creative variations like how to draw a pumpkin face, how to draw a pumpkin patch, and even how to draw a pumpkin pie.
By the end, you’ll not only know how to sketch a pumpkin but also how to bring it to life with depth, color, and personality.
Understanding Pumpkin Structure Before You Start
Before you begin learning how to draw a pumpkin, it’s important to understand its basic anatomy. A pumpkin is not just a circle—it’s a segmented fruit with natural ridges, a sturdy stem, and subtle variations in shape.
Pumpkins belong to the species Cucurbita pepo, widely cultivated across North America and Europe. According to the United States Department of Agriculture, millions of pumpkins are harvested annually, especially for fall decorations and Halloween carvings. This popularity makes pumpkins a frequent artistic subject.
Key Structural Elements of a Pumpkin
• The Round Base Shape
When learning how to draw a pumpkin easy, start with a slightly flattened oval rather than a perfect circle. Real pumpkins are wider than they are tall. This subtle flattening adds realism and prevents your drawing from looking artificial.
• Segmented Ridges
Pumpkins have vertical grooves that create segmented sections. These ridges are not straight lines; they curve gently outward from top to bottom. Understanding this helps when practicing how to draw a pumpkin step by step.
• The Stem (Peduncle)
The stem is thick, slightly curved, and often textured. It’s not a thin stick. Observing real pumpkins helps capture authentic detail.
• Light and Shadow Patterns
Pumpkins reflect light differently depending on their curvature. Highlights appear on the bulging sections, while shadows deepen in the grooves.
• Surface Texture
The surface is smooth but not glossy. Adding subtle texture lines enhances realism.
• Natural Imperfections
Real pumpkins are rarely symmetrical. Slight irregularities make your drawing more lifelike.
Also Read:- How to Hard Reset iPhone: Complete Step-by-Step Guide for All Models
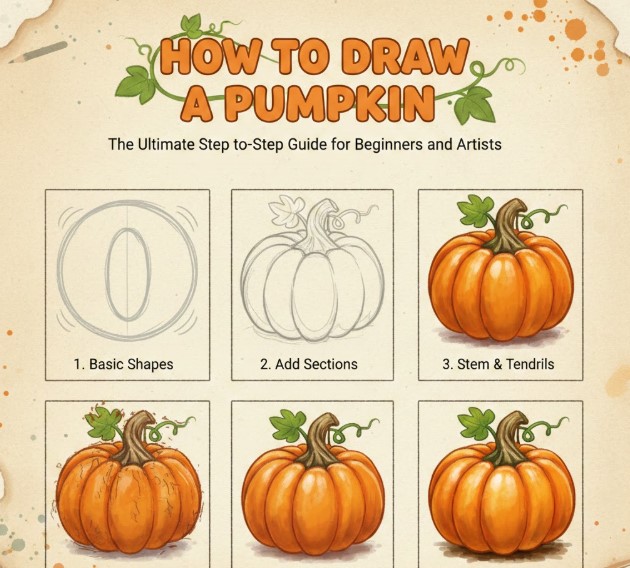
How to Draw a Pumpkin Easy for Beginners
Learning how to draw a pumpkin easy starts with simplifying complex shapes into basic forms. This method builds confidence and accuracy.
Step-by-Step Beginner Method
• Start With a Flattened Circle
Draw a wide oval as your base. Keep your pencil strokes light so adjustments are easy. This base sets proportion and balance for the entire drawing.
• Add Curved Vertical Lines
From top to bottom, draw curved lines to divide the pumpkin into sections. Keep them symmetrical but slightly varied to avoid stiffness.
• Shape the Top and Bottom
Flatten the bottom slightly and add a shallow indentation at the top where the stem will sit. This adds dimension.
• Sketch the Stem
Draw a thick rectangular shape with curved edges. Slightly tilt it for natural appearance.
• Refine the Outline
Erase unnecessary guidelines and strengthen your main lines.
• Add Basic Shading
Shade along the grooves to create depth. Blend gently for smooth transitions.
This simple process forms the foundation for mastering how to draw a pumpkin step by step.
Also Read:- How to Get Voice Chat on Roblox: Complete Step-by-Step Guide
How to Draw a Pumpkin Step by Step With Realistic Detail
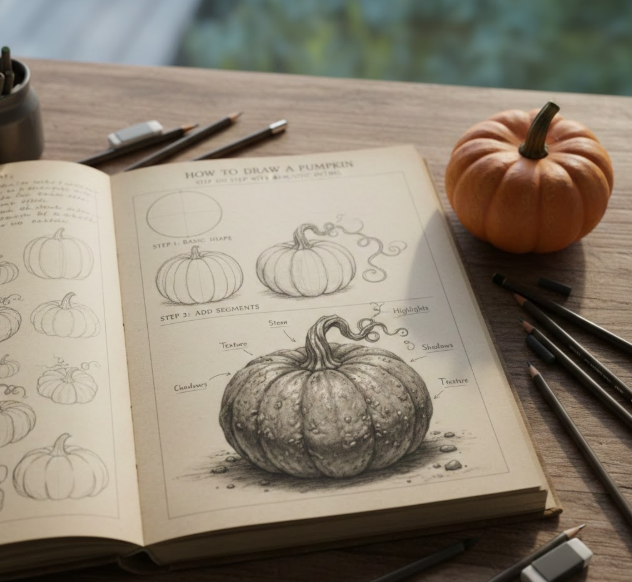
If you want realism, follow this structured approach.
Advanced Realistic Technique
• Build From a Sphere
Visualize the pumpkin as a 3D sphere. Sketch it lightly to guide perspective.
• Map Out Segments Carefully
Divide the sphere into equal curved sections. Make outer segments slightly wider than inner ones.
• Define Light Source
Choose one direction for light. Consistency in shading is critical for realism.
• Layer Shadows Gradually
Use soft pencils (2B–6B) for deeper shading. Darken grooves to enhance dimensional contrast.
• Add Texture Lines
Light vertical strokes create organic texture.
• Highlight Reflections
Use an eraser to lift graphite in highlight areas.
This technique is often taught in beginner art courses inspired by classical realism traditions seen in institutions like the Royal Academy of Arts.
Also Read:- How to Get Rid of a Hickey: Complete Guide to Fast Healing
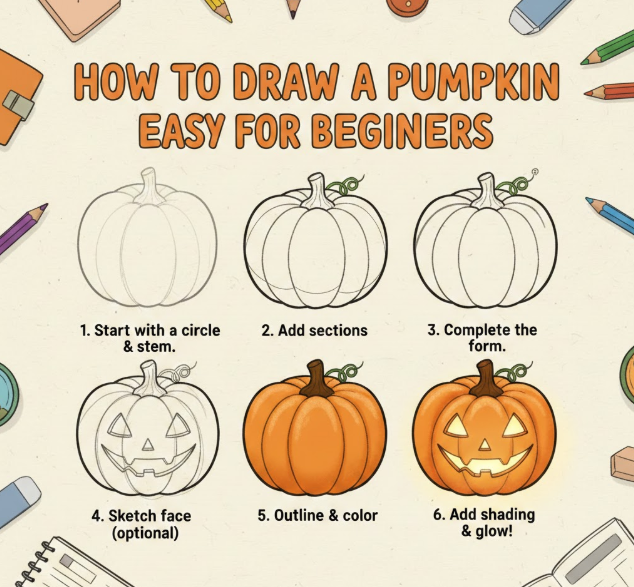
How to Draw a Pumpkin Face (Jack-o’-Lantern Style)

Halloween pumpkins are iconic. If you’re learning how to draw a pumpkin Halloween theme, facial design is essential.
Designing a Pumpkin Face
• Plan Expression First
Decide whether it’s scary, funny, or mischievous.
• Draw Triangle Eyes
Keep symmetry for balance, but vary angles for personality.
• Add a Nose Shape
Traditional jack-o’-lantern noses are triangular.
• Sketch a Jagged Mouth
Use zigzag lines for a classic Halloween look.
• Create Inner Glow Effect
Shade inside the cut areas darker to simulate hollow depth.
• Add Flickering Light Illusion
Use bright highlights near edges to mimic candlelight.
The jack-o’-lantern tradition became popular in North America during the 19th century, influenced by Irish folklore.
Also Read:- How to Grow Tomatoes: The Complete Step-by-Step Guide for Every Space
How to Draw a Pumpkin Patch
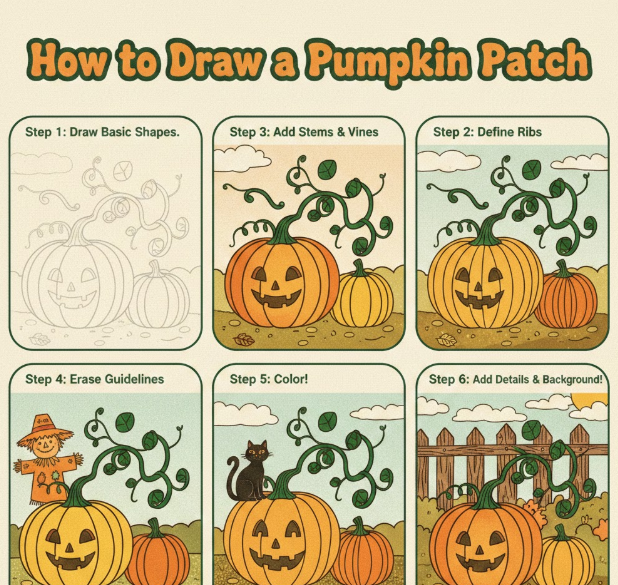
Drawing multiple pumpkins creates a fall landscape scene.
Building a Pumpkin Patch Scene
• Start With Horizon Line
This sets perspective depth.
• Vary Pumpkin Sizes
Larger pumpkins in front, smaller in back.
• Add Leaves and Vines
Draw twisting vines for realism.
• Include Texture Details
Add grass strokes around bases.
• Create Overlapping Shapes
Overlap pumpkins to enhance depth.
• Use Soft Background Shading
Light shading behind enhances foreground focus.
This method improves environmental drawing skills and composition balance.
Also Read:- How to Block Your Number: A Complete Privacy-Focused Calling Guide
How to Draw a Pumpkin Pie

Pumpkin pie is another seasonal favorite.
Drawing a Pumpkin Pie Slice
• Sketch a Triangle Base
This represents a slice.
• Add Curved Back Edge
Round it to form crust.
• Draw Layer Separation
Define crust and filling clearly.
• Shade the Filling Smoothly
Keep texture soft.
• Add Whipped Cream Detail
Use circular swirl strokes.
• Enhance With Plate Outline
Add simple plate base for realism.
Also Read:- How to Clean Dishwasher – The Ultimate Expert Guide for Deep Cleaning, Hygiene, and Long-Lasting Performance
How to Draw a Pumpkin Cute (Cartoon Style)
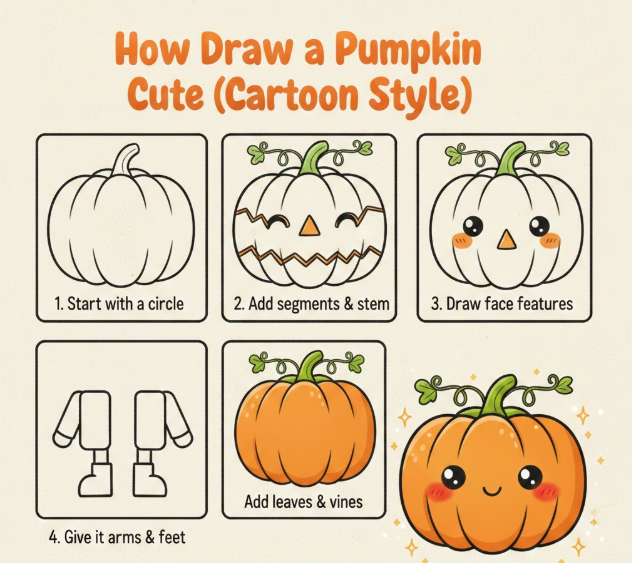
Cartoon pumpkins are expressive and fun.
Cute Pumpkin Drawing Tips
• Use Big Round Eyes
Large eyes create charm.
• Add Small Smile
Keep mouth simple.
• Exaggerate Proportions
Oversized head enhances cuteness.
• Use Soft Colors
Light orange and pastel tones.
• Add Blush Marks
Small cheek circles add personality.
• Simplify Shading
Minimal shadow keeps style playful.
Also Read:- How to Juggle – The Ultimate Expert Guide to Mastering Balance, Coordination, and Control
How to Draw a Pumpkin Halloween Scene
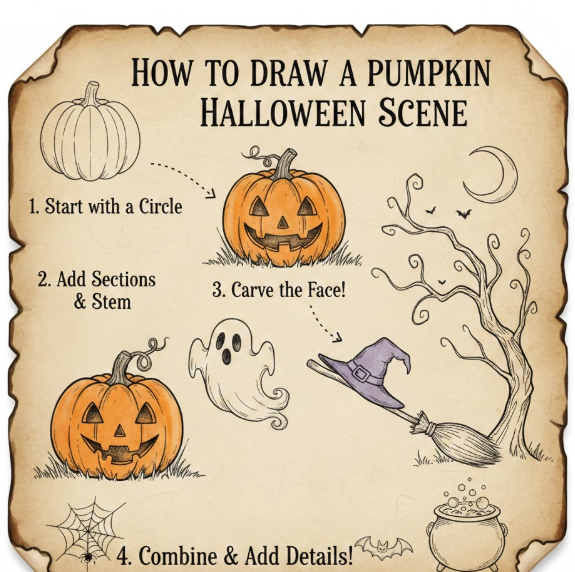
For dramatic Halloween art:
• Add Night Background
Dark sky shading creates contrast.
• Include Bats Silhouettes
Small wing shapes enhance mood.
• Draw Crescent Moon
Position behind pumpkin.
• Add Glowing Eyes
Bright interior shading simulates candlelight.
• Use Strong Contrast
Deep blacks enhance drama.
• Incorporate Fog Effect
Soft erasing technique adds mist.
Also Read:- How to Change Oil: The Complete Expert Guide for Engine Protection, Performance, and Longevity
Professional Shading and Coloring Techniques
• Use Layered Pencil Grades
Start light, build darker.
• Blend With Tissue or Blender
Smooth transitions improve realism.
• Experiment With Colored Pencils
Layer red and yellow into orange.
• Use Complementary Colors for Shadow
Hint of blue deepens contrast.
• Control Pressure Variation
Light strokes prevent smudging.
• Preserve Highlights
Avoid over-blending bright areas.
Also Read:- How to Draw a Flower: A Complete Beginner-to-Advanced Drawing Guide
Common Mistakes to Avoid
• Drawing perfect circles
• Ignoring light direction
• Over-darkening grooves
• Forgetting stem texture
• Skipping background context
• Using flat shading
Conclusion
Learning how to draw a pumpkin is more than sketching a round shape—it’s about understanding structure, light, texture, and creativity. Whether you want to create a realistic autumn still life, a glowing jack-o’-lantern, or a cute cartoon pumpkin, mastering foundational steps ensures success.
Practice consistently, observe real pumpkins, and experiment with shading techniques. With patience and creativity, your pumpkin drawings will become vibrant, dimensional, and expressive.
FAQs
How to draw a pumpkin easy for kids?
Start with a wide oval, add curved lines for segments, and keep shading minimal.
How to draw a pumpkin step by step realistically?
Focus on sphere construction, curved ridges, and consistent light direction.
How to draw a pumpkin face for Halloween?
Sketch triangle eyes, jagged mouth, and dark interior shading.
How to draw a pumpkin patch scene?
Use perspective scaling and overlapping pumpkins.
What tools are best?
HB pencil, 2B–6B for shading, blending tools, and colored pencils.
For More Updates Visit: Biomagazine